The Ultimate Yoga Guides
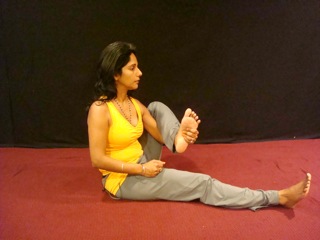
Basic Yoga Exercise for FlexibilityOne of the most important basic yoga sets on this website, is the Yoga for Meditation Set. It is part of the Silent Mind Meditation Program, which is the essence of my personal meditation practice, and details the Silent Mind Meditation Technique, which in my view is the ultimate meditation practice.This Yoga for Meditation set is excellent for those looking to improve their flexibility, especially the flexibility of their lower body, which is essential if you are going to sit for long periods of meditation. It consists of some great basic yoga stretches which should be a part of every yogi's toolbox. But, of all the great flexibility improving yoga poses that are a part of this set, there is one that is key for those who are keen on sitting more comfortably. That is Yoga Cradle Rock. Yoga Cradle Rock, is a basic yoga stretch which one is usually taught early in their yoga training. It is from the school of Hatha Yoga, but is used by most other types of yoga as well. As simple as this yoga exercise is, it is really a difficult one to describe in words and an illustration demonstrating how to do this pose correctly is long long overdue. So first, many apologies for those who have been waiting patiently for an illustration, but I am happy to announce ! that you wait is now over as I have gotten Trupti to do this demonstration for us and you will find those illustrations below. More Basic Yoga Exercises and Stretches: You will find plenty more basic and advanced yoga stretches and exercises in the following 2 free online collections - Free Hatha Yoga Galleries and Free Kundalini Yoga Exercises. For Yoga and Meditation Certification Program Students:For students enrolled in the Online Yoga Teacher's Training and Certification Program or Online Meditation Certification Program, this is a great exercise to do early in your class, as it will help your students sit comfortably for any meditation or sitting poses you plan to do. Also, as this is a relatively easy exercise to do, almost all students can practice it.Basic Yoga Stretch – Yoga Cradle RockBelow please find details of how to practice Yoga Cradle Rock, along with illustrations, step-by-step instructions, benefits and practice tips. Please note the cautions regarding your knees when doing this exerise.Yoga Cradle Rock Illustrations
Cradle Rock Front – Illustration #1
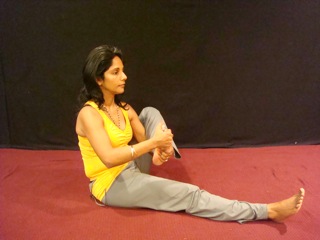
Cradle Rock Side View – Arm Position – Illustration #2
Cradle Rock Side Full – Illustration #3
A. How to Yoga Cradle Rock:
B. How Much To Do:
|
|
Posted: 05 May 2013 04:00 AM PDT
Yoga Exercise to Improve WillpowerThere are many traditional yoga exercises that are indicated for those interested in improving their willpower and overall mental strength. Many of these techniques work on the navel region, which is the location of the Manipura or Navel Chakra and is responsible for one's willpower and strength of character. Here are some testimonials of how working on this center has helped readers develop their confidence and willpower – Yoga for Willpower and Self-Confidence Testimonials.You can easily search this website for sets and exercises that work on this region, by searching for abs, stomach or navel chakra. Also, here is a nice article which helps you determine the condition of each of your chakras and provides exercises and techniques to help balance the one's that need work – How to Heal and Balance Your Chakras. So if you feel you need to improve your willpower, pick the techniques that help charge the Navel Chakra. I though have another recommendation for you if you are looking to build your willpower and inner strength, and that exercise is Yoga for Nerve Power. This exercise, as it's name indicates, is actually for strengthening your nervous system, but I have found it very useful for increasing mental strength as well. More Yoga Poses for Willpower: As usual this technique will be added to our ongoing free online c! ollections - Free Hatha Yoga Galleries and Free Kundalini Yoga Exercises. There you will find many of the poses which work on the abdominal region as well, but there is another great pose for building willpower which is part of the collection that I want to point out and that is Yoga Jesus Pose for Inner Strength. Jesus Pose is similar to Yoga for Nerve Power and I have found it equally beneficial for building and improving willpower. Both these poses come from the school of Kundalini Yoga. Yoga and Stress Reduction Certification Program Teacher Tips:For students enrolled in the Online Yoga Teacher's Training and Certification Program or Online Stress Reduction Certification Program, typically this exercise is done at the end of a set, but you can work it into any yoga routine as well in a location that is sensible. As it requires rapid arm movement, it is a good idea to stretch one's shoulders and arms prior to doing this technique. Also, as this is a relatively easy movement to do, almost all students can practice it. The willpower building affect is related to how long one can keep this up for :-).Yoga Exercise for Nerve Strength and WillpowerBelow you will find details of how to practice this pose, along with illustrations, step-by-step instructions, benefits and practice tips.Yoga for Willpower Illustrations
Yoga for Willpower – Illustration #1

Yoga for Increasing Willpower – Illustration #2

Yoga for Willpower – Illustration #3
A. How to do Yoga for Nerve Strength:
B. Duration:
|
|
Posted: 05 May 2013 03:00 AM PDT
Meditation GuideIn part 1 of this series, 10 Helpful Meditation Tips, I shared with you 5 useful tips to help you develop your meditation practice. There 5 tips were…1. Stretch well before meditation to help you sit more comfortably. 2. Find the right meditation posture and use props or even walking meditation to help you succeed. 3. Do peace bestowing yoga breathing exercises before meditation. 4. Don't be over ambitious with regard to your practice and set achievable meditation goals. 5. Find a meditation group to practice with as this will go a long way in keeping you inspired and consistent. Today, in part 2, I will give you 5 more useful tips which should help you establish and enjoy a daily meditation practice. 5 More Tips To Help You Meditate Better1. Be Kind To Yourself:Real meditation is hard work. This is especially true if you have gone deep into this art and are now at the stage of doing the ul! timate meditation which I define as, comprehending your thoughts from moment to moment via direct perception. If you have sincerely tried this, you will realize that it is not a trivial ask. Thoughts are subtle and swift and in order for them to be "digested", a great deal of energy, awareness and intelligence is needed. So if you are struggling, that is ok. This is a challenge for all of us, so don't add obstacles by thinking negatively and being harsh on yourself. Even if you are not doing such advanced meditation, in general meditation is not easy. Sitting still, focusing, attending, letting go, etc, can all difficult be to do, so don't beat yourself up if you are not meditating well all the time. At the end of the day all you can do is put your best foot forward. Enlightenment is not a guarantee, you can simply do your best and leave the rest in the hand's of the Universe. 2. Stay Aware at All Times: Meditation is not just about sitting for 20 minutes or 1 hour a day. Meditation is a full-time job. Try, as best as you can, to be as mindful and aware of that which is taking place in your outer and inner environment all the time. See how well you can remain an observer, a witness, to the comings and goings of your life. This practice is the key to undoing the detrimental conditioning that has been done to the human mind and is the key to encountering what is Real and Ultimate. 3. Eat Right: There is a good reason why Ayurveda, the holistic science of health and healing, says that one should eat light and pure (satvic) food. It is because it helps the body, mind and senses be more sensitive, and sensitivity is another way to describe a meditative life. For meditators there are 2 aspects of eating right. First, they should eat light and healthy food in general to promote alertness and sensitivity, and second, prior to sitting in meditation, they should not eat a heavy meal to avoid feeling sleepy and lethargic. You can read more about right eating in the following 3 popular articles: 11 Guidelines for Eating Healthy Healthy Ayurvedic Diet to Lose Weight 7 Tips to Becoming Vegetarian 4. Find a Teacher, Book or Video: In the article, 3 Simple Tips to Invite Enlightenment, I discussed how simply reading enlightened material can refine one's energy, trigger kundalini and create shifts of consciousness. Reading good books and learning from a good teacher can do a great deal more as well of course. Yo! u can learn how to meditate correctly, be inspired and also, get their guidance on how to overcome blocks or obstacles. If you can find a great teacher near you, certainly take the opportunity to learn from them and if you need suggestions on some good books, you can check out the following article and comments thread… Best Spiritual Books 5. Set a Meditation Time and Space: I have written about this before and want to emphasize it again here. Don't underestimate the value of setting a definite time for meditation and creating a meditation space. Both these items will be very useful to you in establishing a consistent, daily meditation practice, the value of which is immeasurable. The following 2 articles go over these 2 items in detail and provide you many more tips and advice to help you meditate better. Essential Meditation Tips and Tools for Daily Practice Meditation Tips | Help for Beginners If you have some meditation tips or advice, please do share that with us in the comments section below. Also, if you enjoy this article, please share it with your family and friends on FB, Twitter etc :-). |
Posted: 05 May 2013 02:00 AM PDT
Although a great deal of emphasis is often placed on the higher chakras, the importance of the lower 3 charkas, the root chakra, sex chakra and navel chakra, should not be underestimated. Balancing these chakras is equally important for living a healthy, productive and happy life, and of these 3 charkas, the one that is often out of balance is the root chakra.
In the article, Chakra Healing | How to Balance Your Chakras, I provided details for how to analyze your chakras and determine which ones needed work. In that article I also provided various exercises and poses you can use to heal and balance the weak chakras. Below is the criteria to determine if your root chakra, which is responsible for physical security, fear and overall health, needs attention…
1. You feel physically weak and insecure.
2. You have constant health issues and illnesses.
3. You have a great deal of fear.
4. You don't feel connected to the Earth or a part of nature.
If the above criteria apply to you, then working on your root chakra will be the way to help resolve these issues. For those who are new to Kundalini Yoga or the Chakra System, the following articles would be helpful: Kundailni Yoga Seven Chakra System Overview and Introduction to Kundalini Yoga.
Alternate Root Chakra Cleansing Exercise:
In the article, Chakra Healing | How to Balance Your Chakras, I provided details for how to analyze your chakras and determine which ones needed work. In that article I also provided various exercises and poses you can use to heal and balance the weak chakras. Below is the criteria to determine if your root chakra, which is responsible for physical security, fear and overall health, needs attention…
1. You feel physically weak and insecure.
2. You have constant health issues and illnesses.
3. You have a great deal of fear.
4. You don't feel connected to the Earth or a part of nature.
If the above criteria apply to you, then working on your root chakra will be the way to help resolve these issues. For those who are new to Kundalini Yoga or the Chakra System, the following articles would be helpful: Kundailni Yoga Seven Chakra System Overview and Introduction to Kundalini Yoga.
In addition to the exercise I am going to detail for you in this article, there is another technique on the website which is great for clearing the root chakra and that is Yoga Crow Pose for Cleansing Root Chakra. That article also has a video demonstration of crow pose along with modifications, etc.
Yoga Frog Stretch for Root Chakra:
The particular pose I am going to discuss in this article is called Yoga Frog Stretch. This should not be confused with Frog Pose, which is a great Kundalini Yoga Exercise for toning one's thighs and buttocks. Frog Stretch on the other hand, is simply excellent for stretching your inner thighs, hips and groin, and excellent for balancing and cleansing your root chakra.Originally, I started Kundalini Yoga in order to help me sit longer for meditation, so this was an exercise that I did religiously. It is perfect for stretching those areas one needs to open up in order to sit comfortably in meditation for long periods of time. For this reason, this exercise is a key component of the Yoga for Yoga Set as well.
More Yoga Exercises and Stretches:
Frog Stretch will of course be added to our ongoing yoga poses and exercises collections which you can access from t! he follow! ing pages - Free Hatha Yoga Galleries and Free Kundalini Yoga Exercises.
For Yoga and Yoga Certification Course Students:
For students enrolled in the Online Yoga Teacher's Training and Certification Program or Online Yoga Certification Program, I suggest practicing this exercise during the warm-up phase as it will assist in doing any vigorous lower body work you are planning for your students.Root Chakra Exercise – Yoga Frog Stretch
Below please find details of how to practice Yoga Frog Stretch, along with illustrations, step-by-step instructions, benefits and practice tips. As you can see this is a difficult exercise to describe in words, so I feel the illustrations should be particularly helpful and are long overdue :-).Frog Stretch Illustrations

Frog Stretch – Illustration #1

Frog Stretch – Illustration #2
A. How to do Yoga Frog Stretch:
- Lie on your back and bring both legs up in the air. Your legs should be bent at the knees and the soles of your feet pointing up towards the sky. See illustration #1 above.
- Next reach up with your hands and hold the soles of your feet. You are holding your feet as shown in the illustrations above. The hands are on the inside of the feet as you are gripping the arch of each foot. See illustration #2 above.
- Now pull down and have your legs stretch wide apart. You are pulling your knees down your armpits to create a good stretch in your groin region, hips and inner thighs. As usual, only stretch as far as is comfortable and increase the stretch as you feel yourself getting warmed up.
- This pose will allow you to relax your rectum and lower muscles. Do so consciously.
- I love doing this exercise with powerful Breath of Fire. If you feel ready you should try that as well. You can also switch to long deep breathing or normal breathing whenever necessary. Doing this exercise with the Breath of Fire I feel enhances the cleansing affects for the root chakra.
B. Duration:
- I suggest holding for 1 minute and building up to 3, 5 or even 7 minutes.
C. Frog Stretch Benefits:
- Helps open up your groin and increases the flexibility and health of this region.
- Helps improve the flexibility of the inner thighs and hips as well, helping you to sit more comfortably in meditation.
- Excellent for balancing, healing and cleansing the root chakra.
- Done with Breath of Fire it gives you a good opportunity to expand and strengthen your respiratory system.
D. Practice Tips for Frog Stretch:
- You can do this stretch more than once in your routine. I suggest doing it once early in your set and then again later once you are more warmed up.
- You can do Mula Bandha squeeze and release at the end of the exercise 3 times to really bring focus to cleansing the root chakra.
- If you have difficulty sitting in meditation for long periods of time, certainly do this pose prior to your meditation session to he! lp you si! t more comfortably.
Posted: 05 May 2013 01:00 AM PDT
Cow Pose for Stress Relief
It is no secret that yoga is great for releasing stress and tension, and is probably one of the best sciences for inducing relaxation and a peaceful state of mind and body. As the body heals itself best when it is relaxed, this ability of yoga to bring harmony and tranquility is certainly one of the reasons why it is such a wonderful healing modality and why it is prescribed so often for so many ailments. Now, all yoga is not necessarily relaxing.
There are plenty of yoga poses and exercises which promote high energy and are designed to counteract lethargy or depression. But of the exercises that do bring about a relaxed state of being, Cow Pose (Gomukh Asana) is certainly one of the best.
Another great thing about yoga, is that it can be practiced by kids, adults and seniors, and poses which have certain benefits, offer those benefits to whomsoever practices them. Thus you can also have your kids practice this pose as well if you wish to help them calm down and get centered.
More Yoga Poses to Release Tension:
Equally as good as physical yoga postures to promote relaxation are of course yoga breathing exercises and meditations. So below I have provided you with some breathing techniques and meditations which will help you de-stress. Also below are a few more yoga poses which are ideal for those looking to get rid of anxiety and find peace.
Deep Relaxation with Yogic Breathing | Bhramari Pranayama
Yogic Breathing for Insomnia | Ujjayi Pranayama
3 Minute Yogas for Fast Relaxation
Best Relaxation and Stress Relief Pose
Baby Pose to Calm the Mind.
More Yoga Exercises and Stretches:
In addition to the exercises and poses above, you will find more yoga techniques in the following 2 online collections - Free Hatha Yoga Galleries and Free Kundalini Yoga Exercises. Cow Pose will also be added to these collections, as all new poses are indexed there.
Caution: Cow Pose should not be done by those with knee problems, and those with severe back or neck issues, should be extra cautious and at minimum use a strap as explained in the practice section below.


B. Duration:
It is no secret that yoga is great for releasing stress and tension, and is probably one of the best sciences for inducing relaxation and a peaceful state of mind and body. As the body heals itself best when it is relaxed, this ability of yoga to bring harmony and tranquility is certainly one of the reasons why it is such a wonderful healing modality and why it is prescribed so often for so many ailments. Now, all yoga is not necessarily relaxing.
There are plenty of yoga poses and exercises which promote high energy and are designed to counteract lethargy or depression. But of the exercises that do bring about a relaxed state of being, Cow Pose (Gomukh Asana) is certainly one of the best.
Another great thing about yoga, is that it can be practiced by kids, adults and seniors, and poses which have certain benefits, offer those benefits to whomsoever practices them. Thus you can also have your kids practice this pose as well if you wish to help them calm down and get centered.
More Yoga Poses to Release Tension:
Equally as good as physical yoga postures to promote relaxation are of course yoga breathing exercises and meditations. So below I have provided you with some breathing techniques and meditations which will help you de-stress. Also below are a few more yoga poses which are ideal for those looking to get rid of anxiety and find peace.
Deep Relaxation with Yogic Breathing | Bhramari Pranayama
Yogic Breathing for Insomnia | Ujjayi Pranayama
3 Minute Yogas for Fast Relaxation
Best Relaxation and Stress Relief Pose
Baby Pose to Calm the Mind.
More Yoga Exercises and Stretches:
In addition to the exercises and poses above, you will find more yoga techniques in the following 2 online collections - Free Hatha Yoga Galleries and Free Kundalini Yoga Exercises. Cow Pose will also be added to these collections, as all new poses are indexed there.
For Yoga and Yoga Certification Course Students:
For students enrolled in the Online Yoga Teacher's Training and Certification Program or On! line Yoga Certification Program, please note that this is not the easiest pose to take, so please ensure that your students and clients are not forcing their bodies into this posture.Caution: Cow Pose should not be done by those with knee problems, and those with severe back or neck issues, should be extra cautious and at minimum use a strap as explained in the practice section below.
Yoga to Release Tension – Cow Pose
Below please find details of how to practice Yoga Cow Pose, along with illustrations, step-by-step instructions, benefits and practice tips.Cow Pose Illustrations
Cow Pose – Illustration #1
Cow Pose- Illustration #2
A. How to do Yoga Cow Pose:
- ! Start by sitting up straight with your legs crossed.
- Next bring your right leg further over your left leg such that your right foot is close to your left hip. Be careful not to strain your right knee when doing this and only go as far as comfortable.
- Next bring the left ankle closer to the right hip with the intent of having the knees one of top of the other. Try not to lose the alignment of your spine and neck as you come into this posture.
- In Illustration #1, Trupti is showing a variation of Cow Pose, where the arms are simply kept out to the side. So try this variation first to get accustomed to the leg position. Once you have taken the pose, breathe long and deep and feel the tension melting away with every breath. After about a minute, switch sides and repeat.
- Once you feel comfortable with the easier variation, try the formal arm position. For the arm position bring your right arm over your shoulder as shown in Illustration #2 (like you are going to scratch your middle back). Then bring your left arm up shown and reach towards your right arm. If possible clasp the fingers of your hands together. This is the final posture for Cow Pose. If you are unable to clasp your fingers that is fine, use a strap or small towel and hold each end, pulling your hands as close as comfortable with excessive strain.Remember the shoulder and elbow joints are quite sensitive so don't force the arms and incur injury. Just practice consistently using a strap and as your flexibility grows you will be able to form this posture.
Again do long d! eep breat! hing and feel yourself relaxing more and more with each breath. After 1 minute, switch sides for legs and arms once done and repeat.
B. Duration:
- Do 1 minute per side and build up to 3 minutes per side.
C. Cow Pose Benefits:
- Helps release stress to promote peace and relaxation.
- Helps improve the flexibility of your hips, knees, shoulder and arms.
- Helps release tension in the shoulder, back and neck.
- Good for the kidneys and combating high blood pressure.
D. Practice Tips for Cow Pose:
- This tip is not just for Cow Pose, but for whenever you are using yoga as a tool for stress relief. Do the yoga poses more slowly, with full awareness and also hold them for longer periods to time. This method will help induce greater calmness than fast, quick movements.
- I want to repeat the caution of being careful with your knees and shoulders for this pose. It is worth warming up and doing this posture after you have done some simple stretches.
- See if you can figure out why this pose is called Cow Pose :-).
Posted: 05 May 2013 12:00 AM PDT
Previously, guest author, Richard wrote popular articles about Om Mantra Chanting, The Awakening of Kundalini and Energy Centers, Yoga Pranayama for Beginners and So Hum Mantra Yoga. Today he discusses with us the meaning, benefits and great power of the Gayatri Mantra . In the article below you will also find links to download a free MP3 of the Gayatri Mantra along with links to videos of Gayatri Mantra Yoga.
Richard is a meditation teacher and author, and you will find more information on the courses he offers on his website Shaktipat-meditation.org.
 The Gayatri practice was secret for thousands of years.
Today, it's heard everywhere in India, Earth's most Spiritual land.
Priests chant Gayatri Mantra in Temples.
S! ai Baba taught Gayatri to his followers.
So did Sri Aurobindo. And Sri Swami Shivananda.
Cowherds seeking Divinity chant Gayatri from dawn till dusk as they follow their Holy cows.
House wives chant Gayatri Mantra as they sweep the pavement in front of their homes to create lovely chalk mandalas bringing great good fortune.
What's the amazing attraction to Gayatri? How does the Gayatri Mantra work? Where did it come from? And, most important of all, what are the wonderful benefits of chanting the Gayatri Mantra?
Free Gayatri Mantra MP3 Download
TIP – Correct pronunciation is important to direct the energy to activate the proper centers inside yourself. V in Sanskrit is SOMETIMES enunciated W as in Svaha (Swaha).
S. Krishnamurthy's translation of the mantra works well with Anmol's exercise for opening the Third Eye:
We meditate upon the radiant Divine Light
of that adorable Sun of Spiritual Consciousness;
May it awaken our intuitional consciousness.
Another translation could be:
Radiant Divine Soul from which we all cameAwaken the same brilliant Divine Light in meSo that inner radiance consumes all thought and emotionTeaching and guiding me to realizing reality
You've attained a very high level of realization when the brilliant radiance inside you merges with the Divine Soul. You become the Divine Soul. It's not that difficult. The power of Gayatri helps get you there faster.
You become Divine.
For many centuries, Gayatri was kept secret by Gurus and Yogis because of its power. As with so many other secret, ancient practices, it's only in recent times that this amazing mantra has become widely available to all.
Gayatri:
Meaning of the Full Version of Gayatri Mantra:
Bhuhu is the physical plane or Earth
Bhuvaha is the astral –the energy underlying the physical
Suvaha is the mental world of thought
Mahaha is emotions
Janaha is creative generation
Tapaha is intuition
Satyam is the absolute from which the tru! e teachin! gs come
By chanting the introduction, you're telling the energy created by Gayatri to progressively work through from the grossest physical level of your being to the highest, most refined aspect of you, purifying all.
You become purer, more refined and more translucent –Divine in all aspects. Swiftly becoming Divine radiant light is the greatest benefit and is the goal of chanting Gayatri morning, noon and night.
Chanting Gayatri may bring immense, practical benefits into your life as well as grant you the ability to become eternal, luminous light.
Please, share your comments or questions below.
You can quickly learn how to meditate in person, one-on-one Skype classes, and download Richard Crown's free E-books, at Shaktipat-meditation.org.
This posting includes an audio/video/photo media file: Download Now
Richard is a meditation teacher and author, and you will find more information on the courses he offers on his website Shaktipat-meditation.org.
Gayatri – The Ancient, Supreme Mantra
Today, it's heard everywhere in India, Earth's most Spiritual land.
Priests chant Gayatri Mantra in Temples.
S! ai Baba taught Gayatri to his followers.
So did Sri Aurobindo. And Sri Swami Shivananda.
Cowherds seeking Divinity chant Gayatri from dawn till dusk as they follow their Holy cows.
House wives chant Gayatri Mantra as they sweep the pavement in front of their homes to create lovely chalk mandalas bringing great good fortune.
What's the amazing attraction to Gayatri? How does the Gayatri Mantra work? Where did it come from? And, most important of all, what are the wonderful benefits of chanting the Gayatri Mantra?
Gayatri Mantra
First, let's learn the mantra. Then, while you're experiencing the energy Gayatri creates in you, we'll discuss its meaning, history, and benefits. You may feel the blissful effects as you begin chanting the short, easy version of the supreme mantra right now with Anmol's wife Trupti.Free Gayatri Mantra MP3 Download
Om Bhur Buvaha Svaha
Tat Savithur Varenyam
Bhargo Devasya Dheemahi
Dhiyo Yonaha Prachodayath
You'll find also find 3 excellent videos here.Tat Savithur Varenyam
Bhargo Devasya Dheemahi
Dhiyo Yonaha Prachodayath
TIP – Correct pronunciation is important to direct the energy to activate the proper centers inside yourself. V in Sanskrit is SOMETIMES enunciated W as in Svaha (Swaha).
Gayatri Mantra Meaning
The words Gayatri Mantra could be translated as meaning: prayer of praise that awakens and liberates. One of the reasons this mantra is so effective is that it combines both prayer and mantra techniques that take you very deep into meditation.S. Krishnamurthy's translation of the mantra works well with Anmol's exercise for opening the Third Eye:
We meditate upon the radiant Divine Light
of that adorable Sun of Spiritual Consciousness;
May it awaken our intuitional consciousness.
Another translation could be:
Radiant Divine Soul from which we all cameAwaken the same brilliant Divine Light in meSo that inner radiance consumes all thought and emotionTeaching and guiding me to realizing reality
You've attained a very high level of realization when the brilliant radiance inside you merges with the Divine Soul. You become the Divine Soul. It's not that difficult. The power of Gayatri helps get you there faster.
Gayatri Mantra Origins
The Vedas are some of the earliest scriptures, going back 2,500 to 3,500 years. Gayatri is mentioned numerous times as being the supreme mantra. In the Bhagavad Gita, Krishna proclaims to Arjun! a, "I a! m the Gayatri." This means that all of Krishna's attributes can be experienced by chanting Gayatri.You become Divine.
For many centuries, Gayatri was kept secret by Gurus and Yogis because of its power. As with so many other secret, ancient practices, it's only in recent times that this amazing mantra has become widely available to all.
Gayatri Mantra Benefits
Becoming radiant Divine light is the greatest benefit, but if that's not enough for you, or you think it's too far away, along the path to Divinity there are many other benefits that you can enjoy sooner.Gayatri:
- Removes obstacles from your life
- Protects you from danger
- Brightens you mind
- Dispels ignorance
- Improves communication abilities
- Opens your psychic vision
- Brings direct knowledge of the eternal truths
Full Version of Gayatri Mantra
For those of you who want a little more, chant the long version. The introduction invokes the power of Gayatri in all seven lokahs, or dimensions, purifying and empowering all areas of your life. Reciting all seven lokas before chanting Gayatri energizes all of your chakras, adding efficacy, clarity and power.
Om bh! ahu<! /span>
Om bhuvaha
Om suvaha
Om mahaha
Om gahaha
Om tapaha
Om satyam
Tat Savithur Varenyam
Bhargo Devasya Dheemahi
Dhiyo Yonaha Prachodayath
Bhargo Devasya Dheemahi
Dhiyo Yonaha Prachodayath
Om apo jyotih rasamritan
Brahma bhur bhuvas suvar
Om
You can listen to a rendition sung beautifully in Western style here Gâyatrî Mantra.Meaning of the Full Version of Gayatri Mantra:
Bhuhu is the physical plane or Earth
Bhuvaha is the astral –the energy underlying the physical
Suvaha is the mental world of thought
Mahaha is emotions
Janaha is creative generation
Tapaha is intuition
Satyam is the absolute from which the tru! e teachin! gs come
By chanting the introduction, you're telling the energy created by Gayatri to progressively work through from the grossest physical level of your being to the highest, most refined aspect of you, purifying all.
You become purer, more refined and more translucent –Divine in all aspects. Swiftly becoming Divine radiant light is the greatest benefit and is the goal of chanting Gayatri morning, noon and night.
Advanced Gayatri Mantra Yoga
Take this practice to a higher level by visualizing brilliant, luminous light appearing at one of two centers inside yourself while chanting.- Your pineal gland at the base of your brain. See a brilliant ball or crystal of luminous light form, expand and become permanent. It grows as you practice Gayatri regularly. Use this visualization in conjunction with Anmol's Third Eye opening exercise.
- Your Thymus gland high in the center of your chest. Do the same visualization as in number one above.
Chanting Gayatri may bring immense, practical benefits into your life as well as grant you the ability to become eternal, luminous light.
Please, share your comments or questions below.
You can quickly learn how to meditate in person, one-on-one Skype classes, and download Richard Crown's free E-books, at Shaktipat-meditation.org.
This posting includes an audio/video/photo media file: Download Now
Posted: 04 May 2013 11:00 PM PDT
Wishing all of you a very happy, healthy, successful and awakened 2013. I would like to thank everyone for all their love and support in 2012 which has helped Mastery of Meditation and Yoga become one of the biggest yoga websites on the internet. I have a some great plans for 2013, which include more online classes, yoga and meditation videos, mantra and music mp3s and even live webcasts and workshops, all for free of course :-).
To kick off the new year I would like to publish for you the very important yoga for flexibility routine. The full set can be found in the article, Yoga for Meditation. I provided this set in a newsletter a few months ago, but wanted to publish it on the website as well so everyone can have access to it.
This workout is excellent for developing lower body flexibility and contains some key yoga poses to help stretch and open up this region. Many of these exercises are difficult to explain, so the illustrations below should be very useful to you.
For those interested in meditation, this routine is especially useful as the poses improve the flexibility of those regions which tend to give trouble when one is sitting for meditation. So if you are finding meditation uncomfortable, I strongly suggest doing these poses prior to sitting and in a few months you will notice a remarkable improvement in your flexibility and consequentially sitting will be much easier.
Also, for those students enrolled in the yoga teachers training or meditation certification program, this set is a must. For yoga teachers this is a great routine to do when starting your class to warm-up and prepare the body for more advanced poses and as explained above, for sitting in meditation, this is one of the best sets you can practice.
Recently I have also been adding these poses individually to the website, and so you can click the title to read the full article on that particular pose.
Yoga Routine for Flexibility:
Some titles below are links to the article with all the details including cautions, benefits, practice tips, etc. So click that to read the full article.
This is the most basic and effective pose for those looking to improve their flexibility for meditation. It is also an ideal pose with which to begin your yoga session. Done with Powerful Breath of Fire, it can get you energized as well.
Recently I also created a video for this pose and you will find it here – Yoga Helps Meditation Video – Butterfly Pose.
To! practice! this pose come into the position as shown by the illustration below and hold for 1-3 minutes. More details in the article and video.
Butterfly Pose
#2: YOGA CRADLE ROCK
For the long time readers of the website and the fans of the Free Silent Mind Advanced Meditation Program, I know these illustrations are long overdue :-). Cradle rock is excellent for opening up the hips and for helping you sit cross legged better, but it is a difficult exercise to describe without illustrations.
Thankfully I was able to get my wife Trupti, also a fellow yoga teacher, to demo the exercise recently and below are illustrations on how it is done.
To practice this pose rock each leg as shown for 1-2 minutes. By rocking I mean to bring the ankle towards the chin and then back to the starting position. For more details about this exercise, please visit the set I have linked to above, it is exercise #13 in that set.
Cradle Rock Front
Cradle Rock Side View – Arm Position
Cradle Rock Side Full
#3: YOGA COW POSE OR YOGA KNEE BOUNCE
Cow pose is a great pose for improving the flexibility of your hips.
Below is a picture of modified Cow Pose, which is a pose you can come into for 1-2 minutes. If you are unable to do this pose, then substitute it with Yoga Knee Bounce instead.
Yoga Knee Bounce Instru! ctions:</! strong>
To do Yoga Knee Bounce, sit with up with your legs extended in front of you. Then bend your left leg and place your left ankle high up on your right knee. Hold onto your left knee with both hands and bounce the knee gently up and down. Do for 1-3 minutes, and then repeat with the other leg.
Be sure you don't force this exercise or force yourself into Cow Pose below.
Modified Cow Pose
This is another exercise from the Yoga for Meditation Set (Exercise #8), which really needs to be illustrated for clarity sake. Again, for this pose I will publish a detailed article soon with some variations, but below are instructions and illustrations on how to do this great stretching pose.
To do Frog Pose lie on your back and bring both legs up into the air with the soles of the feet pointing up towards the sky. Reach up with your arms and hold onto your feet and pull your knees down towards your armpits.
The legs should be spread wide, creating a stretch in the groin area. You should be holding your feet from the the inside such that the back of your hands are facing each other and your fingers are curled around the arches of your feet.
You can see from the explanation above, why illustrations would be helpful for this pose :-). Hold the pose for 1-3 minutes, and do either long deep breathing or Breath of Fire.
Frog Pose
Frog Pose Hands Close Up
#5: LOWER BACK STRETCH
Along with tight hips, groin and knees, another common issue when sitting for long periods of meditation, is having lower back pain. So it is a good idea to stretch out the back as well prior to meditating, so you can sit steadily and silently for extended periods without discomfort.
Here is a simple back stretching exercise which will help you accomplish this. Just follow the illustrations below and stretch each side for 1-3 minutes.
Happy Meditating :-).
Lower Back Stretch Left
Lower Back Stretch Right
This set will become part of the Free Online Yoga Sets collection here on Mastery of Meditation and Yoga, and you can visit that collection to find more great yoga routines to help you develop your lower body flexibility.
Posted: 04 May 2013 10:00 PM PDT
Learn To Do Yoga Series – Vajrasana
Today I am happy to introduce a new guest author of Mastery of Meditation of Yoga – Christian Leeby. Christian is a fellow blogger and adept yogi. His expertise lies in the area of how to do yoga poses correctly with special emphasis on alignment and form. Please do visit his website the Miracle of Yoga (http://www.miracleofyoga.com) which is a great resource of free yoga articles and excellent how to do yoga videos!If you would like to be a guest author on Mastery of Meditation and Yoga, please email me at anmol@anmolmehta.com.
How to To Yoga Vajrasana
By
Christian Leeby
Think about it, the legs are almost always working. Except when we're sitting with the feet propped up or sleeping, the legs are doing the work of supporting the body, even when we're sitting. Most sports or physical activities are workouts for the legs; walking, running, skiing, lifting weights, biking, and even most Yoga poses (asanas). The legs are under a lot of use and a lot of strain most of our lives. So recuperating the legs with the right Yoga poses are really important.That's where Vajrasana, or Yoga Rock Pose comes in.
What is Yoga Rock Pose:
Vajrasana is a kneeling pose where the knees are together, the feet are together, and the hips are seated on the heels. It's the classic kneeling pose that kids naturally sit in. This position stretches all of the muscles on the front of the legs, as well as the knee and ankle joints; a great combination for creating better range of motion. In addition, the restful nature of the pose makes it ideal for recuperation because the legs don't have to work, and you can sit in the pose for time which creates a deeper effect.How to Do Yoga Vajrasana:
There are 3 main things you should know about when practicing Vajrasana.First is, see that the legs, ankles, and feet are straight before you sit back. That means there's a straight line from where the knees meet, to the space between the ankles, to where the big toes touch each other. If your legs are not straight, then nothing else will be because the legs are the foundation in this pose. Take your time and look. After seeing that the knees are together, turn your head, and look over your shoulder to make sure the feet and ankles are in line, you might be surprised to see that they're not as straight as the feel.
Next is to place a cleanly folded blanket or towel in the back of the knee joints as you sit back. This is not to help you sit, it's a prop that puts space in the knee joints. I can sit comfortably with no props in this pose, but I want to get the best benefit in the knees, so I always use this prop because it hugely increases the therapeutic benefit of the time you spend in the pose.
Finally, learn how to use props if your ankles are too stiff or if your knees are too rigid or sensitive. You have to be able to sit straight up in the pose,! which me! ans the crown of the head right over the inner ankle bones. If you're leaning forward it's because your ankles can't stretch that much, your knees can't bend that much, or both.
For the ankles simply roll a blanket or towel and place it right under the ankle bones. If it doesn't work and they still hurt, roll it fatter. Here's a two minute video that shows you exactly how to do this:
How To Do Yoga Rock Pose Video
Yoga Rock Pose Practice Tips:
If the knees feel strained that's not okay. In many Yoga poses we have to feel some intensity to get the most out of it, but in Vajrasana your knees should be totally comfortable; that's very important. Simply put blankets or bolsters or firm pillows on the heels so that when you sit back the hips don't go down as far, and the knees don't bend as much. If you prop the ankles and hips high enough you should be able to find a very comfortable, easy position. That's what you're looking for. If you can't find comfort in the pose, you're not ready for it.Once you've found a comfortable position with good alignment in the legs, then you can start reducing the roll under the ankles and/or taking height away from the hips. Slowly over time discarding the props under the ankles and hips.
Do keep the one blanket into the back of the knees though, because that one is always to your advantage due to the space it creates in the knees.
How to Do Yoga Rock Pose Summary:
Kne! eling in Vajrasana is a great recovery for the legs. Do it correctly and you'll be amazed at how much better your ankles, knees, and even hips feel after practicing. Practice this pose after standing poses to rest the legs, and casually at home after any workout that was tough on the legs, or as a daily therapy for knee or ankle issues. You'll see improvement.For more free videos on how to do yoga, please visit Christian's site the Miracle of Yoga (http://www.miracleofyoga.com).
Posted: 04 May 2013 09:00 PM PDT
Healing Your Aura
It has been some time since I published a technique to do aura healing. Previously I wrote about 2 useful techniques for working on your aura and they are Eagle Pose for Powerful Aura and Yoga Criss-Cross for Aura Cleansing. Today's technique though is quite different from these 2 techniques as it has a very large visualization and mental component. So for those who are artistic or visual in nature, this technique will be perfect for you :-).This technique is usually part of a set specifically designed to work on your aura, but of that set it is generally the key exercise. I suggest doing these exercises independently as a mini set, or adding them to to end of a routine focused on energy and refinement.
Your aura, as per Kundalini Yoga, is the sum total power of your nervous system and it reflects the power of the prana or life force flowing through you. The greater your aura the more magnetic and influential you can be, and those that have great presence and charisma are those who have a strong, bright aura.
When it comes to health, healing and working on yourself, it is important not to overlook the power and influence of your mind and this particular technique exploits that dimension. Specifically, it uses the power of visualization to help you develop and energize your aura.
Yogic Breathing for Aura! Purification:
As I explained above, auric power is a reflection of pranic power, so the more clear your channels the better the flow of prana (life force) and the brighter and clearer your aura. So along with physical and mental exercises, breathing techniques are also excellent for healing your aura. Below are 2 such techniques which are very useful for this.
You can use these breathing exercises to create your own aura healing set. Do them first and then do the aura healing technique.
Anuloma Viloma Pranayama
Bhaktrika Yoga Pranayama
More Yoga Exercises and Stretches:
In addition to the exercises and poses above, you will find more yoga techniques in the following 2 online collections - Free Hatha Yoga Galleries and Free Kundalini Yoga Exercises. Also, you will find more useful breathing exercises in the Free Online Yoga Pranayama Collection.
For! Yoga and Meditation Certification Course Students:
For students enrolled in the Online Yoga Teacher Training and Certification Course or Online Meditation Certification Program, note that these poses are challenging to hold for extended periods of time. So the best way to motivate your students to do these postures is to do them yourself along with the class. This way you are leading by example and you are also working on healing and cleansing your own aura at the same time :-).Aura Healing Technique
Below please find details of how to practice this technique, along with illustrations, step-by-step instructions, benefits, cautions and practice tips.Aura Healing Technique Illustrations

Aura Healing Right to Left – Illustration #1

Aura Healing Left to Right – Illustration #2

Aura Healing Visualization – Illustration #3
A. How to do Aura Healing:
- Start by sitting up straight with your legs crossed. Close your eyes. If you cannot sit cross legged you may sit up on a chair. It is important to keep you back straight though.
- Take 5 slow deep breaths and clear your mind of all worries, anxieties and fears. Relax.
- Next lift your right arm straight up with palm facing in and fingers extended and left arm straight out to the side, with palm facing up and fingers extended, as shown in Illustration #1 above.
- Now begin the Breath of Fire Breathing Exercise. And while holding this position, visualize a waterfall emanating from your right palm, arching down and falling onto your left palm. If you have trouble visualizing a waterfall, you can visualize a white, bright beam of light arcing between your right palm and left palm. If you have trouble keeping up with Breath of Fir! e, switch! to Long Deep Breathing instead. Hold and continue to visualize for a duration that is comfortable for you.
- Next reverse the arm positions as shown in Illustration #2 above and again do the visualization along with the Breath of Fire. Continue for an equal time.
- Finally, extend both arms out to the sides, with palms facing up and fingers extended and visualize the waterfall or semicircle of light flowing between the 2 palms. Remember to continue with the Breath of Fire.
- To end, lower your arms to your lap, switch to long deep breathing and for 5 slow breaths visualize yourself with a shinning bright white aura. End with a smile.
B. Duration:
- Depending on your capacity, start with 15 seconds for each phase of this exercise and build up from there. You can do up to 3 minutes per phase.
C. Aura Healing Benefits:
- Helps to heal, charge and energize your aura.
- Increases your charisma and magnetism.
- Makes you more influential and powerful.
- Protects you from negative energies.
- Improves your lung capacity and strengthens your shoulders.
- Helps you develop your power of visualization and creativity.
D. Practice Tips for Aura H! ealing:
- If you are new to doing Breath of Fire and are having trouble with it, this is not uncommon so don't fret. It takes time to get this breathing correct. Exclusively practice Breath of Fire for 1-3 minutes daily and it will help you master it. In the meantime use long deep breathing for the aura healing technique.
- If your arms get tired, you can lower them and place them in Cosmic Mudra, but continue to do the visualization and breathing.
- Remember with regard to discomfort, that often the mind gives out first, so impose your spirit over your mind and go further than you think you can.
Posted: 04 May 2013 08:00 PM PDT
Exercise for Longevity
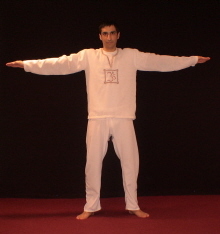
Kundalini Yoga does offer some very unique and even peculiar exercises and that variety is actually something which many find quite attractive about this type of yoga. The one thing that you cannot say about Kundailni Yoga is that it is boring :-). There are exercises where you are are sticking your tongue out, shouting, dancing, shaking and even exercises where you are rolling on the floor or flapping your arms like a bird. Good fun!As compared to all these unusual exercises, the one I am going to discuss today is probably quite tame, but recently I came across some research on longevity which actually used this very technique to determine if you will live longer. The reasoning and thinking behind this research is really quite sound and I thought the results of this study would be very interesting to all of you as well.
The technique that was used to test longevity was simple – you had to sit down and stand up. In the study you had to simply sit down and then get back up, while in the yoga technique you have to sit down in the cross legged posture and then stand back up. The challenging part, of course, is that you have to do this without using your hands or knees.
For the study, if you were able to sit down without using your hands, legs, knees, elbows, arms, etc you got 5 points, and if were able to get up the same way, you would get another 5 points. So 10 points were maximum. 1 point was taken away for using any body part, such as a hand, knee or arm, either on the way down or on the way up. Also, if you were unsteady as you went up or down, you lost half a point. So what di! d the results show?
Those who got the lowest score, between 0 and 3 were 6.5 times more likely to die in the next six years, than those who scored a 10. And as the scores increased the likely hood of dying kept diminishing, with those who scored in the 6 to 7.4 range, were only 1.8 times more likely to die. So the essential conclusion was that being able to sit and stand without support is a good indication of your overall health from a strength, agility, coordination, balance and flexibility standpoint. Not bad for a simple yoga technique :-).
There are actually several Kundalini Yoga sets which incorporate the Sit-Stand exercise and I will certainly share those complete sets with you in the near future, but for now you are welcome to use this exercise in your own routine or independently as a barometer of how healthy you are.
In addition, you can also keep track of your improving health by seeing how you can improve your score over time. If you only score a 1 or 2 initially, that is ok, start living a healthy life and incorporating yoga and fitness in it and see if you can over time improve your score. Give yourself 3 months and then retest, you might be surprised of how much you can improve and thus extend your life.
More Yoga Exercises for Longevity and Long Life:
Yoga, in general, is excellent for health, healing and longevity. There is a great deal of research now that supports the wonderful health benefits of yoga, but there are also specific yoga poses and exercises which are known for their anti-aging and life promoting benefits. Below you will find a few of these technique! s.!
The Best Anti-Aging Yoga Exercise
Yogic Breathing for Insomnia and Longevity | Ujjayi Pranayama
Fountain of Youth Yoga Set
More Yoga Exercises and Techniques:
In addition to the exercises and poses above, you will find more yoga techniques in the following 2 online collections - Free Hatha Yoga Galleries and Free Kundalini Yoga Exercises. Also, you will find complete yoga sets and free online yoga classes on the following pages Free Online Yoga Sets and Free Online Yoga Classes. I hope you take advantage of this ancient wisdom to help you improve your health and live longer.
For Yoga and Meditation Certification Students and Yoga Teachers:
For students enrolled in the Online Yoga Teacher Certification Program or Online Meditation Instructor Training Program, I do hope you introduce this interesting exercise to your students. Make sure you are sensitive to the different levels of your students and emphasize to them to not be competitive. Yoga is about "you and you alone", it is not about competing with others. So each student should only be looking to see how they can improve their score over time and not be competing with other students regarding that.Caution: Although this exercise sounds simple, for seniors, those who are weak, overweight or those with bad knees, this exercise can be VERY challenging. Also, to get up and sit down without using any body parts, especially hands and knees, is definitely not easy. So please guide your students accordingly.
Sit-Stand Yoga Exercise
Below you will find details of how to practice this exercise along with step-by-step instructions, benefits and practice tips. Please note that there are 2 small difference between the technique used in the study and the yoga version of this exercise. These difference are as follows:1. In the version used for the longevity test, you are attempting to get up without using any body part for leverage, but in the Kundalini Yoga version you are simply to sit and stand without using your hands (you can use one or two knees on the way up or the way down). So if you are going to use this technique for the longevity test and score yourself, then you should try it the way it was designed in the study.
! 2. In the yoga version you sit down cross-legged, while for this study you simply had to sit down.
A. How to do Sit-Stand Yoga Exercise:
- Start by sitting on the floor with your legs crossed.
- Next try to stand back up without using your hands for help. Note for the longevity test you should try to do this exercise without using hands or knees.
- Once standing, sit back down with your legs crossed and again try not to use your hands to help you sit down.
- Repeat 10 times and build up to 26 to 52 repetitions over time.
B. Repetitions:
- Try to build up to 52 repetitions in a row.
C. Sit-Stand Yoga Exercise Benefits:
- Helps you develop lower body strength and tone your legs and buttocks.
- Helps your heart and improves your circulatory system.
- Improving how you do this correlates directly to how long you live. So this exercise promotes longevity.
- Improves the flexibility in your hips, knees and ankles.
- Improves your agility, balance and coordination.
D. Practice Tips for Sit-Stand ! Yoga Exer! cise:
- As I have indicated above, this exercise is not as easy to do as you might think, especially with using no leverage, so please be careful when trying it.
- Don't try this on a slippery floor, especially if you are trying to do it without any leverage.
- Careful of your hips and knees when doing this exercise.
- If sitting with your legs crossed is difficult you can simply sit down with your legs in front of you.
- To motivate yourself, if you start to tire, remember all the benefits that this exercise bestows and keep going!
Posted: 04 May 2013 07:00 PM PDT
For those who are not signed up to receive my monthly newsletter, here is the January 2013 edition. It was quite popular as it featured the best yoga techniques of 2012 and the top 5 articles from last year as well. So in case you missed any of the top content here is your chance to catch up :-).
For those who missed the previous newsletters you will find them archived here – Mastery of Meditation Newsletter Archives.
Also, for those who are interested is self healing and healing others, I want to introduce you to a great Online Reiki Master Certification Program. You will find more details below.
This Edition Features :-
- Top 5 Articles from 2012.
- Top 5 Yoga Techniques from 2012.
- Online Reiki Master Certification Program.
Top 5 Articles from 2012:
Titles below are links to the full article.
http://anmolmehta.com/blog/2012/07/10/how-to-stop-negative-thinking-and-overcome-negative-thoughts/
Learn what the 6 signs of negative thinking are and then learn 10 proven techniques to help end negative thinking and overcome negative thoughts.
So now that you have ended negative thinking, it's time to take it to the next level and live a meaningful and joyful life :-). So hear over to this article to learn 5 great techniques for accomplishing that.
http://anmolmehta.com/blog/2012/01/05/help-me-lose-weight/
http://anmolmehta.com/blog/2012/05/30/ayurvedic-treatment-for-healing/
Here is Pat's true story of how she lost significant weight doing Kapalbhati Yoga Pranayama. In this article you will also find links to other weight loss resources, including Ayurvedic Diets, Yoga Sets to burn fat and Meditations to help you reach your weight loss goals.
This article details an excellent 8 Step Ayurvedic Program to help you get healthy, quit addictions and live a vibrant, energetic and long life.
http://anmolmehta.com/blog/2012/01/23/signs-and-symptoms-of-the-kundailni-awakening-experience/
If you think you are experiencing Kundalini Awakening you can head over to this article and read all about the signs and symptoms that accompany a full blown kundalini event.
5 Best Yoga Poses o! f 2012:

http://anmolmehta.com/blog/2012/12/05/root-chakra-yoga-exercise/
http://anmolmehta.com/blog/2012/03/07/beginners-yoga-exercises/

 http://anmolmehta.com/blog/2012/12/11/yoga-to-release-tension/
Yoga Cow Pose

Starting Position


Titles below are links to the full article, so click the link to read the full details on the particular exercise.
http://anmolmehta.com/blog/2012/11/27/increase-willpower-yoga-exercise/
Here is an unusual Kundalini Yoga exercise which is actually designed to improve your nervous system, but serves a dual purpose by also being excellent for building your mental strength and willpower.
From the position below, you will be raising and lowering your arms rapidly 6 inches in each direction. Check the article for all the details and tips.
Starting Position
Along with Yoga Crow Pose, this is another great yoga pose for clearing and balancing the root chakra. It also, of course, helps to stretch the groin and hips to assist in sitting in meditation.
Yoga Frog Pose
Here is an exercise that has been enjoyed by almost every student in my yoga classes and it is a regular part of my yoga routine as well. This simpl! e exercis! e helps you stretch, warm-up and also strengthen your abs and core. Very useful indeed :-).
To do this exercise you will simply rock back and forth as shown below, inhaling as you lean back and exhaling as your lean forward.
Yoga Rowing Back
Yoga Rowing Front
Here is a more recent addition to our Online Hatha Yoga Collection. It is the beautiful Cow Pose, which is wonderful for relaxing and releasing tension, while at the same time stretching your hips, ankles and thighs.
Please follow all cautions for this ! exercise ! given in the article so you can avoid any injury.
Yoga Cow Pose
http://anmolmehta.com/blog/2012/01/18/easy-fat-burning-exercise-yoga/
A really fun, energetic and good fat burning exercise is Yoga Jumping Jacks. They are actually not as easy as you think and to do it right you will require quite a bit of mental focus and concentration as well. Just try it and see :-).
To do Yoga Jumping Jacks, from the starting position, inhale half way and jump to the half-way position as shown. The legs should only be half-way apart at this time. Then complete the inhalation and complete the jump as shown in the full jump illustration below.
Then exhale half way and come back into the half-way position. Finally complete the exhalation and come back to the starting position. Slowly build up to a set of 100.
Starting Position
Half-Way Jump
Full Jump
Online Reiki Master Certification:
I have always been fascinated by energy and holistic healing arts and of them, Reiki especially has been of great interest to me. So when I found Adele and Gary's Certified Usui Reiki Master Self Study Course, it certainly caught my attention.
Since I offer online training as well, I know it can work well if the course is well designed, properly thought out, affordable and a product of love and passion. I am happy to say that this course is really all that and more.
If you are interested in self healing or becoming a Certified Reiki Practitioner or even a Reiki Teacher, I suggest checking out this program. It is really comprehensive and Reiki, like other holistic sciences, can certainly transform your entire being and life for the better :-).
Click the link or image below to explore the program more…
Posted: 04 May 2013 06:00 PM PDT
Simple Yoga Move
Some Kundalini Yoga sets are seriously tough. They are physically and mentally challenging, requiring both, a sound body and mind, to do well. But, thankfully, often in such difficult sets are yoga moves that are easy to do and thus offer an opportunity to recover a little. The exercise I am going to detail in this article, is one such exercise, which is easy to do, makes one feel good and has some very useful benefits as well.Although the advanced routines I would not suggest for beginners, this yoga move is certainly one that most everyone will be able to do. So if are just beginning yoga, no need to worry, this exercise will be fine for you to do as well. The pose is also suitable for seniors and children to practice.
There are some variations to this move and you will find those detailed in the practice section of this article below. Do try them, as they allow you to accent the stretch nicely.
More Yoga Moves and Stretches:
For those who are new to this website, you will find more yoga techniques in the Hatha Yoga Poses collection which you will find here and the Kundalini Yoga Exercises collection which you will find here. All new exercises are added to those collections, so you can easily locate yoga poses and moves you wish to practice there.
For Yoga and Meditation Certi! fication Course Students:
For students enrolled in the Yoga Teacher's Training and Meditation Certification Program, go ahead and include this exercise into your routines and classes. Your students will enjoy it, especially if you have a lot of newbies or beginner yogis.For those interested in finding out more about these online certification programs you will find information on the Yoga Certification Program here and the Meditation Teacher's Training Program here.
Easy Yoga Hip Stretch
Below please find details of how to practice Easy Yoga Hip Stretch, along with illustrations, step-by-step instructions, benefits and practice tips.Hip Stretch Illustrations

Yoga Hip Extension Starting Position – Illustration #1

Hip Extension Ending Position – Illustration #2

Extend Left Variation – Illustration #3

Extend Right Variation – Illustration #4
A. How to do Easy Yoga Hip Stretch:
- Start by sitting up with your back straight in rock pose.
- Please your hands on your thighs, palms facing down and close your eyes. If doing this move with your eyes closed makes you dizzy, then you may do it with your eyes open as well. This is the starting position and is shown in Illustration #1 above.
- Now raise up and press your hips forward to create a good stretch when you reach the top. The ending posture is shown in Illustration #2. You should feel a good stretch in your abdominal area as well. Inhale as! you are ! coming up and at the peak of the stretch hold your breath and accent the stretch for a few moments.
- Next exhale and come back down to the starting position. Continue the movement in this fashion, rising up and down. If it feels good you can hold the end position longer to really work the stretch.
- In the variation shown above in illustration #3 and illustration #4, you come up but lean to the left and then come back down, followed by coming up and leaning to the right. This helps you stretch each side of your back and hips and can be more satisfying.
B. Repetitions:
- Start with 10 repetitions and work your way up to 26. From there you can go on and do even more. A set of 52 repetitions would be very effective in opening up your thighs and hips.
C. Hit Stretch Benefits:
- Helps to stretch and open up your hips.
- Helps stretch the thighs.
- Stretches and improves the flexibility of the lower back.
- Good exercise for relaxing and releasing tension.
D. Practice Tips Easy Yoga Hip Stretch:
- Really use your breath when doing this exercise. Expand and fill your lungs to capacity as you move up and exhale completely on the way down.
- Use this exercise in between sets and exercises which are taxing so give yo! u some re! prieve.
- Another nice variation to this exercise is to raise your arms up as you come up and lower your arms as you return to the starting position. With this variation you can do the leaning to the right and left as well to really stretch the sides of your back and torso as well.
Posted: 04 May 2013 05:00 PM PDT
Desire is not to be killed, suppressed or destroyed, nor is it meant to be indulged in senselessly. Desire is the heartbeat of life and the key to mastering life is the understanding of desire. This understanding, which is born out of relentless observation of it's structure and movement, is the road to freedom and Self-realization.
In the excerpt below on the mastery of life and desire, J. Krishnamurti goes into this most important topic and discusses the complexities of desire and how it relates to enlightenment and liberation. Below the excerpt I highlight and discuss some of his key points and ideas.
One of the key points Krishnamurti is making above is the movement of desire from egotistical and self-obsessive to loving and all inclusive. Essentially he is asserting that it is the diminishing of constant self-interest, which ordinary desire is saturated with, accomplished through the act of awareness and discernment, which leads to a life full of joy, love and clarity.
So as much as possible refrain from falling prey and feeding desires that are exclusively self promoting and instead nurture a holistic view of humanity and be compassionate, loving and peaceful.
2. Constant Self Awareness:
To bring about this great change and master your life, you need to be constantly watching the movement of your mind and the ceaseless activity of desire from moment to moment. This is the way forward. Such observation diminishes the grasp which the egotistical mind has over you and frees you from the constant pattern of self-concern.
This demand is indeed great, for the mind is not easily watched and understanding the motivation behind all you do, think and feel is not trivial. But we are speaking of the highest goal of humanity here, so it ought not to be easy. Rise to the challenge, you have what it takes to go all the way.
3. Be Fearless:
As Krishnamurti points out, the mastery of desire and subsequent mastery of life begins with being fearless. Being afraid leads to constant escaping from! the pres! ent and escaping is a self-isolating, ego strengthening activity. In order for desire to move towards love, such endless self-concern has to wither away. Fear promotes the endless search for self-security, while fearlessness allows you to move in a different direction altogether.
Fearlessness allows you to stand apart and examine what is happening dispassionately and impersonally, without needing to seek comfort or security. This examining, inquiring, watching is what leads to the understanding of desire and "what is". Not trying to change "what is" into what "should be", as per the goals and ideals put forth by the fearful mind, is the key to finding your True Self. This state of witnessing and observation, leads to intelligence and opens the door to the beyond.
In the excerpt below on the mastery of life and desire, J. Krishnamurti goes into this most important topic and discusses the complexities of desire and how it relates to enlightenment and liberation. Below the excerpt I highlight and discuss some of his key points and ideas.
J. Krishnamurti on Mastering Life and Desire:
Now desire, contrary to general belief, is the most precious possession of man. It is the eternal flame of life; it is life itself. When its nature and functions are not understood, however, it becomes cruel, tyrannical, bestial, stupid. Therefore your business is not to kill desire as most spiritual people in the world are trying to do, but to understand it. If you kill your desire, you are like the withered branch of a lovely tree. Desire must keep growing and find out its true meaning through conflict and friction. Only by the continuance of the conflict can understanding come. This is what most people do not see. As soon as the conflict comes, and the sorrow born of conflict, they at once seek comfort. Comfort, in its turn, breeds fear. Fear leads to imitation and the sheltering behind established tradition. From this come rigid systems of morality, laying down what is spiritual and what is not spiritual, what is the religious life and what is not the religious life. It is the fear of life which produces guides, teachers, gurus, churches, religions. Please, I know.
None of these things are going to satisfy a mind which is really enquiring, which is really in revolt. As soon as you fear, you have the desire to conform, to listen to everybody, to become a machine, a type. And all this is but contraction, and contraction is slow death. It is not in this way that desire can ever fulfil itself. Growth can only come by the liberation of desire, and liberation here means freeing it from all fear, and so from the cruelty and exploitation which results from the quest of comfort, which is the refuge of fear. And this, in its turn, can only come about through the wearing down of the egotism in desire by contact with life itself. Only in this way can the reality be reached which is the true consummation of desire. And so, truly to grow is to learn to love more and more, to think more and more impersonally, through experience.
Desire, freed from its limitations and from the illusion of fear, becomes joy, which is but the true poise of reason and love. From being at first personal, limited, anxious, clinging, it grows by suffering till it becomes all-inclusive, till it is as the sunset which gives and does not ask anything in return. In the same way, by continual experience, by choosing, by assimilating and rejecting, thought becomes more and more impersonal. When both thought and desire are purified, then we get the perfect balance and harmony between the two, which is the fulfilment of life and which we speak of as intuition. Such purified life is the highest reality, and I say that every man and woman must sooner or later attain to it. It is not reserved for the few, because life is not the possession of the few. It is that which is struggling for realization in every human being, and the path to realization is the same in all cases. It is by struggle, effort, choice and conflict.
Now this highest reality is something which I assert that I have attained. For me, it is not a theological concept. It is my own life-experience, definite, real, concrete. I can, therefore, speak of what is necessary for its achievement, and I say that the first thing is the recognizing exactly what desire must become in order to fulfil itself, and then to discipline oneself so that at every moment, one is watching one's own desires, and guiding them towards that all-inclusiveness of impersonal love and thought which must be their true consummation. When you have established the discipline of this constant awareness, this constant watchfulness upon all that you think and feel and do, then life ceases to be the tyrannical, tedious, confusing thing that it is for most of us, and becomes but a series of opportunities for growing towards that perfect fulfillment.
The goal of life is, therefore, not something far off, to be attained only in the distant future, but it is to be realized moment by moment in that Now which is all eternity. In such realization every moment controls the future; by what you are now, you make yourself the master of tomorrow. To understand life and to live it with understanding you must make yourself free of all the illusions which desire throws up in its efforts to grow. And this means that you must be free of fear, for all such illusions are born of fear. Once you have attained to fearlessness, then you will understand clearly what desire is really seeking, and how it may attain its end. The man who is seeking happiness, and understands what he is seeking, must have no divorce between his desires and his actions. Knowing what desire really wants, he will translate this into daily action. In other words, all his actions will show forth that poise of reason and of love, which is desire's true goal because it is the liberation ! of life.<! /strong>
Mastering Life, Mastering Desire Analysis
1. Selfishness to Love:One of the key points Krishnamurti is making above is the movement of desire from egotistical and self-obsessive to loving and all inclusive. Essentially he is asserting that it is the diminishing of constant self-interest, which ordinary desire is saturated with, accomplished through the act of awareness and discernment, which leads to a life full of joy, love and clarity.
So as much as possible refrain from falling prey and feeding desires that are exclusively self promoting and instead nurture a holistic view of humanity and be compassionate, loving and peaceful.
2. Constant Self Awareness:
To bring about this great change and master your life, you need to be constantly watching the movement of your mind and the ceaseless activity of desire from moment to moment. This is the way forward. Such observation diminishes the grasp which the egotistical mind has over you and frees you from the constant pattern of self-concern.
This demand is indeed great, for the mind is not easily watched and understanding the motivation behind all you do, think and feel is not trivial. But we are speaking of the highest goal of humanity here, so it ought not to be easy. Rise to the challenge, you have what it takes to go all the way.
3. Be Fearless:
As Krishnamurti points out, the mastery of desire and subsequent mastery of life begins with being fearless. Being afraid leads to constant escaping from! the pres! ent and escaping is a self-isolating, ego strengthening activity. In order for desire to move towards love, such endless self-concern has to wither away. Fear promotes the endless search for self-security, while fearlessness allows you to move in a different direction altogether.
Fearlessness allows you to stand apart and examine what is happening dispassionately and impersonally, without needing to seek comfort or security. This examining, inquiring, watching is what leads to the understanding of desire and "what is". Not trying to change "what is" into what "should be", as per the goals and ideals put forth by the fearful mind, is the key to finding your True Self. This state of witnessing and observation, leads to intelligence and opens the door to the beyond.
Posted: 04 May 2013 04:00 PM PDT
Here is another great article on meditation by guest author Tom Von Deck. Previously Tom wrote about Managing Stress in the Workplace with Yoga, and today's article is a deep dive into what is meditation fundamentally and what are the various types of meditation you can practice.
Tom is a widely respected meditation teacher who also practices Kriya Yoga, Reiki, ThetaHealing, Qigong and more. He is known for his expertise in workplace meditation training and is the author of Oceanic Mind. You can find more information on meditation and his teachings on http://www.deepermeditation.net/.
If you would like to be a guest author on Master of Yoga and Yoga, please email me at anmol@anmolmehta.com.
So, what is meditation? L! et's break it down.
Some of the variables in meditation include:
Meditation objects are usually repetitive like a mantra or constant like a visualization of a waterfall or tree. Some are roving like the body scan meditation in which you are calmly observing the sensations in one body part at a time.
Meditation is the art of falling in love. There is not one woman who is right for every man. There is also not one meditation object that is right for everyone. You need to have an object that you can fall in love with, relax into and merge with.
Concentration meditation works primarily with the object of focus. When the mind wanders, you simply bring the attention back to the object without judgment. However, most meditation techniques add another component. It's called mindfulness, also known as insight or Vipassana.
Mindfulness is the art of being prese! nt with e! xperience as it arises into consciousness. Thoughts, emotions and body sensations are all processes happening in the moment. When the mind gets distracted from the meditation object, you impartially take note of what's going on. You can use the word "thinking" or "anger" if it helps you to register the experience better. It is as if you are the sky and these processes are the clouds. You are the vast ocean and they are the waves, just rising and falling.
After taking note, you bring your attention back to the object of focus.
The main benefit of mindfulness is equanimity. The ego pushes away uncomfortable experience and clings to comfortable experience. When uncomfortable, it restricts the breath so as not to feel something. Mindfulness trains you to gradually make friends with experience so that you are living life more fully and compassionately in all situations.
As you make friends with all of life's experiences, you become more ocean-like. Calm observation of the processes happening within gradually awakens you to your true self, the place where true happiness exists. The Ocean is deep and still. A storm can only disturb the waves.
There is a whole science to sequencing warm ups, and there are ways to design these strategies yourself using methods you are most compatible with. They vary in complexity. Some yoga classes may start off with stretching and more dynamic and physical exercises and then go into breathing exercises before a few minutes of deep relaxation at the end of class. Qigong sequences can also be complex, and there's often a rhyme and reason to it. If you're just reciting a prayer of gratitude, then it's a lot simpler.
Calming, grounding and centering activities in small intervals add up to huge results. This is true even if you feel no immediate effects. The process occurs below the level of consciousness and creates a snowball effect. Eventually, you have a "quantum leap" of peace and increased energy. This makes it much easier to do your formal meditation practice. They go hand in hand as they both feed on each other. Find a few calming exercises to try for 30 seconds to 5 minutes out of each hour and/or during brief times of inactivity. It really works.
The "what is meditation" question is a very complex one because meditation is such a profound and multifaceted inner process. Hopefully this made it simpler to understand so that you c! an experi! ment much more consciously.
Tom Von Deck is a corporate meditation trainer, speaker and author of Oceanic Mind – The Deeper Yoga Training Course. He specializes in making meditation a much easier process for busy people from all backgrounds. Visit Tom's website at www.deepermeditation.net or take a look at Oceanic Mind on Kindle.
Tom is a widely respected meditation teacher who also practices Kriya Yoga, Reiki, ThetaHealing, Qigong and more. He is known for his expertise in workplace meditation training and is the author of Oceanic Mind. You can find more information on meditation and his teachings on http://www.deepermeditation.net/.
If you would like to be a guest author on Master of Yoga and Yoga, please email me at anmol@anmolmehta.com.
What is Yoga, Really? Breaking It Down.
By
Tom Von Deck
There are tons of different meditation techniques all over the internet. You've probably found some in books, videos and websites such as this one. It can be hard to determine which technique is right for you because they all seem so different. If you want to find the meditation technique that you are most compatible with, it's important to understand all of its components.So, what is meditation? L! et's break it down.
Some of the variables in meditation include:
- Object of focus
- Warm ups for preparing the mind and body for meditation
- The methods for integrating meditation into daily life
Object of Focus in Yoga:
An object of focus is what you are paying attention to during your meditation. It can be a word, a phrase, the breath, a visualized object, a camp fire, a body sensation and many other things. You can choose an object that is devotional such as the phrase Om Namah Shivaya, the Shiva mantra. Many people also choose secular objects like the silently repeated nonsensical word they learned in TM or the feeling of the breath as it enters and leaves the nostrils.Meditation objects are usually repetitive like a mantra or constant like a visualization of a waterfall or tree. Some are roving like the body scan meditation in which you are calmly observing the sensations in one body part at a time.
Meditation is the art of falling in love. There is not one woman who is right for every man. There is also not one meditation object that is right for everyone. You need to have an object that you can fall in love with, relax into and merge with.
Concentration meditation works primarily with the object of focus. When the mind wanders, you simply bring the attention back to the object without judgment. However, most meditation techniques add another component. It's called mindfulness, also known as insight or Vipassana.
Mindfulness is the art of being prese! nt with e! xperience as it arises into consciousness. Thoughts, emotions and body sensations are all processes happening in the moment. When the mind gets distracted from the meditation object, you impartially take note of what's going on. You can use the word "thinking" or "anger" if it helps you to register the experience better. It is as if you are the sky and these processes are the clouds. You are the vast ocean and they are the waves, just rising and falling.
After taking note, you bring your attention back to the object of focus.
The main benefit of mindfulness is equanimity. The ego pushes away uncomfortable experience and clings to comfortable experience. When uncomfortable, it restricts the breath so as not to feel something. Mindfulness trains you to gradually make friends with experience so that you are living life more fully and compassionately in all situations.
As you make friends with all of life's experiences, you become more ocean-like. Calm observation of the processes happening within gradually awakens you to your true self, the place where true happiness exists. The Ocean is deep and still. A storm can only disturb the waves.
Meditation Warm-up Methods
Almost every meditation technique has some type of warm up strategy. In guided meditations, you've probably heard the words, "relax and take a few deep breaths." This is a method for preparing the mind and body for a more profound meditation session. The activities you learn in yoga classes were designed to make meditation easier, regardless of the reasons people do yoga. In some Qigong practices, grounding practices such as body wiping and joint limbering are common. Some contemplative Christians read scripture to get in the mood. Buddhists may use lovingkindn! ess praye! rs or visualizations.There is a whole science to sequencing warm ups, and there are ways to design these strategies yourself using methods you are most compatible with. They vary in complexity. Some yoga classes may start off with stretching and more dynamic and physical exercises and then go into breathing exercises before a few minutes of deep relaxation at the end of class. Qigong sequences can also be complex, and there's often a rhyme and reason to it. If you're just reciting a prayer of gratitude, then it's a lot simpler.
Integrating Yoga Into Your Life
An integration strategy is your plan for integrating meditation into daily life. There's a reason Muslims pray five times per day as a group. Buddhist may try to pay attention to thoughts happening within and become that impartial observer throughout the day. An office worker may pray for peace during the 20 second elevator rides or during traffic stops. Some folks take stretch breaks and do office yoga to anchor themselves back in their bodies.Calming, grounding and centering activities in small intervals add up to huge results. This is true even if you feel no immediate effects. The process occurs below the level of consciousness and creates a snowball effect. Eventually, you have a "quantum leap" of peace and increased energy. This makes it much easier to do your formal meditation practice. They go hand in hand as they both feed on each other. Find a few calming exercises to try for 30 seconds to 5 minutes out of each hour and/or during brief times of inactivity. It really works.
The "what is meditation" question is a very complex one because meditation is such a profound and multifaceted inner process. Hopefully this made it simpler to understand so that you c! an experi! ment much more consciously.
Tom Von Deck is a corporate meditation trainer, speaker and author of Oceanic Mind – The Deeper Yoga Training Course. He specializes in making meditation a much easier process for busy people from all backgrounds. Visit Tom's website at www.deepermeditation.net or take a look at Oceanic Mind on Kindle.
Posted: 04 May 2013 03:00 PM PDT
Simplify Your Life – Part 1
An uncluttered, simple life and an unburdened, clear mind are both very key for spiritual practice and the practice of meditation. Such a life tends to allow one the leisure needed for inner exploration and promotes a mind which has the essential inner space needed for such an exploration to be deep and significant. So how can one go ahead and simplify one's life and un-crowd one's mind in order to set this platform for spiritual evolution? in part 1 of this series on how to simplify your life, I share 3 tips to help you do this.How to Simplify Your Life
1. Simplify Your Finances:
When someone asks me about financial success, I always assert that to me financial success is not a goal in life, but financial freedom sure is valuable. I think this is an important point to understand. As I pointed out above, for meditation and inner growth free time is needed, and financial freedom can be instrumental in helping you obtain this precious free time.Financial freedom means, not needing to work, work, work all the time in order to support your lifestyle or to just keep making more and more money. There is no end to how much money you can earn, and for some, unfortunately, there is also no end to how much money you can spend :-). So be aware that what you are looking for is maximizing opportunity and energy for spiritual growth, and anything that takes away from that is a waste of time.
Of course many of us have to work and earn a living, but if you keep financial freedom as a goal you will not adopt a lifestyle which then demands you to work all the time to keep it up. So this is the first! thing. Don't make lifestyle decisions which will create a crushing financial liability. Don't buy expensive homes and cars, which you cannot reasonably afford, and don't go on endless vacations and shopping sprees, which increase your indebtedness further and further.
Once you are under a mountain of debt and large financial commitments, it can be difficult to climb out of that and financial freedom will become just a distant dream. So don't do it.
The second important aspect of financial freedom, is as much as possible try to set up streams of passive income. I know this is easier said than done, but if you are true in your desire for uplifting the consciousness of humanity, which is of course your consciousness too, then life will give you opportunities. You though will have to take them. It will not happen magically. A billionaire is not going to leave you half his inheritance and chances are you are not going to win the lottery, so be prepared to do what life requires you to in order to accomplish this.
Keep in mind that even small sources of passive income can be helpful in offsetting expenses and bring you closer to financial freedom and the rewards of leisure time which it bestows.
Avoiding overextending financially and easing your earning requirements by setting up passive income, will also help you free your mind from endlessly worrying about finances. In today's world, with all the excessive focus on materialism and stupidly keeping up with the Jonses, many minds are inundated with money worries and anxieties. This adds to the over crowded state of your consciousness and makes meditation and spiritual living more difficult to achieve. So be intelligent in the lifestyle you choose to live and don't end up old and grey wondering what happened to your li! fe.
For those interested in exploring the relationship of money and finances to spiritual living further, you may wish to explore the following articles as well:
Money Money Money and the Path to Enlightenment
Role of Money in Spirituality
2. Have Peaceful Relationships:
I have observed that one of the most disruptive forces for people are relationship conflicts. Whether these are conflicts with our partners, or fights with friends or coworkers, or even disagreements with complete strangers, these conflicts can totally disturb our inner equilibrium and worse wreck havoc in our lives for prolonged periods of time. These disturbances can totally complicating things and dominating our thoughts and feelings day after day.Life is of course a movement in relationships and, let's be honest, we are not yet an enlightened society, so there is bound to be some conflict and disagreement. That is fine, conflict in relationship is actually an opportunity for growth (read The True Purpose of Relationships), but prolonged conflict which stirs constant inner storms is unhealthy and unproductive.
So you need to find peace in your relationships. This may mean developing a more forgiving nature, embracing compassion (read How to Be Compassionate) and also, in some cases, dropping unhealthy relationships altogether.
Having peaceful relationships will greatly help free your mind from worries and stress, and help your mind find the calm and space within for meditation to blossom.
3. Balance Entertainment and Stimulation:
We are starting to become stimulus junkies. All the time looking for some way to get pleasure through stimulation. Whether that is physical pleasure or psychological pleasure, we are constantly looking for stimulation to deliver this pleasure to us. To me this is most alarming for the next generation especially, who seem to have no down time whatsoever and are in a constant state of hyper stimulation from all the technologies that they have access to from an early age.What this constant stimulation does is make the organism insensitive and dull such that the simple and ordinary beauty of life is lost. In addition, since one is always occupied the mind ends up dominating one's day to day life, leaving no room for the heart. Every moment of your life is filled with stimulation so there is no opportunity left for simple observance and communion with life. The wonder of life is lost.
Again stimulation and entertainment are an essential part of daily life, but they have their place. The pursuit of entertainment should not become a dominating force in your life. When one is over entertained, it makes one lazy and incapable of doing what is difficult and uncomfortable. Meditation and spiritual evolution is the growth of being ok with "what is", especially when the "what is" is uncomfortable, but the constant pursuit of pleasure erod! es this p! otential more and more.
So live simply and don't over indulge. Just try it. If you are not eating ice cream all the time, you will really enjoy it when you do have it as a treat. In the same way, the entertainment will be really entertaining, when it is balanced with simpler living. And, as an important consequence, your ordinary life will become special once more. The moment will be enough, will be appreciated and it will be full. Meditation will then be possible.
Ways to Simplify Your Life Summary:
Above I discussed some techniques you can try to help you uncomplicate your life and free your mind. This kind of living promotes inner growth and meditation, thus making it possible to uncover your True Nature. If you have any tips for simplifying your life, please do share them with us in the comments section below. Also stay tuned for the next part of this series for more helpful ways to simplify your life.
Posted: 04 May 2013 02:00 PM PDT
If you want to have a nice flat stomach and toned abs, there are a few important things that you must do. Besides the obvious of watching your diet, you need to develop an exercise routine that combines both, aerobic exercise along with stomach specific resistance exercises. Although there is evidence that resistance exercises help burn fat, aerobic routines are still the best way to help reduce belly fat and body fat in general. Along with aerobic exercises though, you need to combine abdominal training, to achieve the final result of a flat and toned stomach. Luckily yoga can provide you both, an aerobic exercise as well as stomach toning exercises.
Another important aspect of toning muscles and stomach muscles especially is that you need to vary the routines and exercises you do from time to time. This variation ensures that muscles are being worked out effectively and the most is being achieved from the exercises, as muscles get used to repeated patterns and respond less and less to the same routines. For this reason it's good to have many different abdominal workouts in your yoga toolbox and change these routines up from time to time.
Below (#5) you will find a list of abdominal workouts already published on the website, which have been quite popular and are very effective. But for those of you who have already been doing these yoga poses and routines for some time and are looking for some variation, below is another great set of abdominal exercises for you.
Some of these exercises are completely new, while others have been published previously. The set though combines them to form a nice new routine. In addition, this set utilizes a chair as a prop to help you do some of the exercises. For those who are new to yoga, also notice the use of the strap for doing the challenging Yo! ga Boat Pose, which is by the way, excellent for toning and firming your stomach.
For students in the Meditation Teacher's Course (link here), if you are teaching a gentle yoga class or simple stretches prior to meditation, the above advice applies to your class as well.
This set was presented in the December 2012 edition of the Mastery of Meditation and Yoga newsletter.
Yoga Ab Exercises For Flat Toned Stomach:


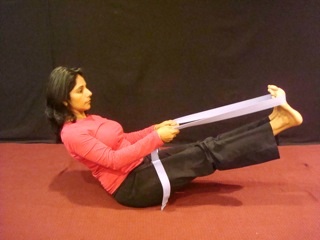


Another important aspect of toning muscles and stomach muscles especially is that you need to vary the routines and exercises you do from time to time. This variation ensures that muscles are being worked out effectively and the most is being achieved from the exercises, as muscles get used to repeated patterns and respond less and less to the same routines. For this reason it's good to have many different abdominal workouts in your yoga toolbox and change these routines up from time to time.
Below (#5) you will find a list of abdominal workouts already published on the website, which have been quite popular and are very effective. But for those of you who have already been doing these yoga poses and routines for some time and are looking for some variation, below is another great set of abdominal exercises for you.
Some of these exercises are completely new, while others have been published previously. The set though combines them to form a nice new routine. In addition, this set utilizes a chair as a prop to help you do some of the exercises. For those who are new to yoga, also notice the use of the strap for doing the challenging Yo! ga Boat Pose, which is by the way, excellent for toning and firming your stomach.
For Yoga Certification Program Students:
For those who are enrolled in the Yoga Certification Course (link here), the yoga leg extensions is an excellent exercise if you are teaching a senior, kids or newbie class. This is a good way to introduce yoga abdominal training to beginners and those who are unfit. Also, it is worth having straps available in your yoga studio so you can show them how to use it for difficult poses like Boat Pose. If you do not have straps you can use a rolled up towel or other such substitute.For students in the Meditation Teacher's Course (link here), if you are teaching a gentle yoga class or simple stretches prior to meditation, the above advice applies to your class as well.
This set was presented in the December 2012 edition of the Mastery of Meditation and Yoga newsletter.
Some titles below are links to the article with all the details including cautions, benefits, practice tips, etc. So click that to read the full article.
Benefits of Yoga Abdominal Training
Kundalini Yoga suggests that one of the first areas to work on if you are new to yoga is the navel center. There are many good reasons for this.
First, developing this region ensures you have great energy and power. Second, working on the stomach area helps alleviate and cure digestive problems. But, most importantly, developing your navel strength also helps you build your strength of character and this is important if you are to establish and maintain a strong, long-term yoga and meditation practice. Finally, of course it is always great to have a nice, flat toned stomach :-).
#1: EASY LEG EXTENSIONS OR STRETCH POSE
One of the very first yoga exercises you learn when embarking on a traditional Hatha Yoga program are these Easy Leg Extensions.
This exercise is not just good for your abs, it is also excellent for keeping your knees lubricated and healthy. In addition, it promotes flexibility in the hamstrings and calves.
There are 2 variations to this exercise, with regard to how to place your hands. In the illustrations below, I am showing the variation where I am leaning back on the palms of my hands.
In an easier variation, you can place your entire forearm and elblows on the ground, with your palms facing down, and lean back. In this variation you will be leaning further back, have more support and the leg extensions will be even easier to do.
If you are just starting out do sets of 6-10 repetitions. You can also take a break by staying in the legs folded positions longer. You can slowly build up to doing this exercise for 1 to 3 minutes.
For your breathing, exhale as you extend your legs out and inhale as you bring them in.
For those who are more fit you can do the famous Yoga Stretch Pose instead.
Here are some illustrations to help you do this exercise correctly.
Easy Leg Extensions – Start
Easy Leg Extensions – Finish
#2: CHAIR CRUNCHES OR POWERFUL AB CRUNCHES
Lately I have been sharing with you some wonderful poses and stretches you can do with the help with a chair and here are some excellent ab crunches you can add to that list.
There are 2 nice variations to these stomach crunches. The first is shown in Illustrations #1 and #2 below, they concentrate on the central abdominal muscles.
The second variation works on your side muscles or obliques. These are shown in Illustration #3 and Illustration #4 below.
I suggest beginners start with 4-6 repetitions and build up slowly from there.
Inhale down and exhale up for both these variations.
! Chair Crunch Down
Chair Crunch Up
Chair Sit-up Left
Chair Sit-up Right
#3: YOGA BOAT POSE
One of the best poses for working on your abs is Yoga Boa! t Pose. A! s this is a difficult pose, there are 3 nice variations to make it easier. You can bend your knees, you can hold your knees or you can use a strap.
You will find useful illustrations below and of course all the details in the article. Do this exercise with Breath of Fire if you can. Start with as little as 15 seconds and build up from there. Some advanced classes require 3, 5 7 and even 11 minutes of Boat Pose!!
Yoga Boat Pose – With Strap
Yoga Boat Pose – Full
#4: YOGA CRISS CROSS – YOGA FOR STOMACH SET
Yoga Criss Cross is part of the excellent Yoga Set to Shape Stomach, the link to which is above.
This is a great exercise ! with whic! h to end any ab workout set, but you can also switch it with boat pose above as a finishing exercise.
To do this exercise you are criss-crossing your ankles at a fast pace, with the legs alternating which is on top. Full details are in the article.
Start with 15 seconds and build up to 1-3 minutes if you can.
Criss-Cross Left Over Right
Criss-Cross Right Over Left
#5: MORE GREAT AB SETS AND EXERCISES
As mentioned above, for abdominal training it is good to mix up exercises and sets as this help to stimulate the muscles and will accelerate the results one gets. So here are some good sets from which you ! can choos! e more abdominal exercise to give you variety and options.
Posted: 04 May 2013 01:00 PM PDT
A vacation can be a great opportunity for spiritual growth as I explained in the article Planning a Spiritual Vacation, but it can also sometimes be disruptive to an established practice, as discussed in the article, It's Wonderful but Dangerous to Your Meditation Practice. With summer time around the corner for us, it is time for vacations and travel once again, and this time I want to present to you the benefits of doing yoga while traveling and while on vacation. This article is by guest author Wesley Vonn, who is a fitness enthusiast and blogger, and is dedicated to healthy living for mind, body and soul.
If you would like to be a guest author on Master of Meditation and Yoga, please email me at anmol@anmolmehta.com.
Many times, when people travel from one location to another, cramped necks, headaches and sore muscles can surface in abundance. Yoga is an excellent physical activity that can be done in small time increments between flights or during a quick car break on a long road trip. Yoga can also be done in a hotel room and the best thing about it is you can do it whether you are staying at a luxury hotel in Las Vegas or a cabin in the woods. Releasing pressure from swollen joints and improving the blood flow to allow oxygen to circulate better in the body are two important benefits that yoga can provide to travelers.
The American Osteopathic Association provides an informative online article that details the numerous health benefits people can experience by engaging in regular yoga sessions. Less mental stress, spiritual benefits, sharper clarity of mind and stronger bodies are just a few health-related positive aspects that yoga can have on a person's life.
Performing yoga on a regular basis can also help to alleviate hunger cravings that many travelers experience. Busy people who travel often for business or pleasure often snack while they are on the go because they rarely have time to prepare healthy meals when they are traveling. Taking part in a yoga session a few times each week helps the body to get better sleep at night; and this reduces restlessness and lethargy that many people try to make up for by eating more food and consuming more caffeine.
Because yoga requires such a small investment of time ! and monet! ary contributions, it is easy for a person to try it out without much risk. You may be surprised to learn how well you feel after just a few yoga workouts in one week. Many people begin to make a morning habit of participating in a yoga session before starting their day so they can reap maximum benefits from the activity.
(Added by Anmol:)
Here are some nice yoga sets and poses to do while traveling which will help you achieve the above benefits outlined by Wes.
Kundalini Yoga Morning Wake-up Series
Yoga Poses for Beginners
Spinal Warm-up Series
Wesley Vonn is dedicated to fitness and living healthy for the positive effects it had on my mood, anxiety, sleep, and overall well-being. He is a true believer in living healthy for the mind, body and soul.
If you would like to be a guest author on Master of Meditation and Yoga, please email me at anmol@anmolmehta.com.
Benefits of Yoga for Travelers and Vacationers
By
Wesley Vonn
People who travel for business or vacation on a consistent basis can reap great results by practicing yoga when they travel. Yoga is stimulating to the mind and body, and it also reduces anxiety that many people often run into during extended travel periods. When a person is traveling to another state, country or continent, numerous things can happen to cause physical or mental anxiety. If a! traveler experiences stress or discomfort while traveling, yoga may be the simplest and most effective solution.Many times, when people travel from one location to another, cramped necks, headaches and sore muscles can surface in abundance. Yoga is an excellent physical activity that can be done in small time increments between flights or during a quick car break on a long road trip. Yoga can also be done in a hotel room and the best thing about it is you can do it whether you are staying at a luxury hotel in Las Vegas or a cabin in the woods. Releasing pressure from swollen joints and improving the blood flow to allow oxygen to circulate better in the body are two important benefits that yoga can provide to travelers.
The American Osteopathic Association provides an informative online article that details the numerous health benefits people can experience by engaging in regular yoga sessions. Less mental stress, spiritual benefits, sharper clarity of mind and stronger bodies are just a few health-related positive aspects that yoga can have on a person's life.
Performing yoga on a regular basis can also help to alleviate hunger cravings that many travelers experience. Busy people who travel often for business or pleasure often snack while they are on the go because they rarely have time to prepare healthy meals when they are traveling. Taking part in a yoga session a few times each week helps the body to get better sleep at night; and this reduces restlessness and lethargy that many people try to make up for by eating more food and consuming more caffeine.
Because yoga requires such a small investment of time ! and monet! ary contributions, it is easy for a person to try it out without much risk. You may be surprised to learn how well you feel after just a few yoga workouts in one week. Many people begin to make a morning habit of participating in a yoga session before starting their day so they can reap maximum benefits from the activity.
(Added by Anmol:)
Here are some nice yoga sets and poses to do while traveling which will help you achieve the above benefits outlined by Wes.
Kundalini Yoga Morning Wake-up Series
Yoga Poses for Beginners
Spinal Warm-up Series
Wesley Vonn is dedicated to fitness and living healthy for the positive effects it had on my mood, anxiety, sleep, and overall well-being. He is a true believer in living healthy for the mind, body and soul.
Posted: 04 May 2013 12:02 PM PDT
In part 1 of this series, Ways to Simplify Your Life, I provided some tips on how you can simplify you life. The 3 tips from part 1 were a detailed discussion into how to move towards financial freedom, the importance of having peaceful relationships and how to balance your entertainment and level of stimulation. Simplifying your life is essential in order to make time for spiritual practice and to un-clutter your mind for meditation to blossom. Today I will continue this important topic and provide you some more life simplification tips.
You are an animal on this planet. Forgot? If you forget you will lose your connection with nature and not being able to connect with nature will make it very difficult to connect with other human animals. This wonderful world, with wide rivers, tall trees and starry skies is your world. When was the last time you looked up at the night sky and wondered about it all? When did you last sit in the shade of a tree and enjoyed the singing birds?
We get so entangled in our lives and are caught in so much ego aggrendization and self protection, that the simplicity and joy of just living has become a distant memory. So get it back by getting back to nature.
Spending time in nature will help you break the ever isolating activity of the ego mind. You will be able to step out of the clutches of society and your busy life for some time and just be aware of and connected to life. This will give you some much needed perspective of your life as you will be able to step b! ack and observe from afar. This is not just contributing to simplicity, but is also part of the process of meditation.
2. Be in the Moment:
One of the best ways to simplify your life and thinking is to learn to live in the moment. All the worrying about the future and all the rehashing of the past can be swept aside by adopting this all important approach.
Live moment to moment, day to day and see what happens. Don't be afraid. Having a plan about things is fine, but fretting and endlessly obsessing on what is going to happen is the surest way to miss living your life altogether. Books have been written on this topic and here is an article on the website which discusses more on how to live in the moment – Zen Mind – The Secret to Living in the Now.
3. Be Honest:
I should rephrase that to "Be Totally Honest". A lot of time and energy is wasted in planning what to say and in manipulating situations to gain desired results. If you decided to be completely honest instead, then you would not need to play all these games, waste all this precious time and complicate matters unnecessarily.
This may not be as easy to do as it seems, but it is eye opening if you try it. Be honest in word and action. So no deception of others and more importantly, no deception of yourself. Just resolve to be totally honest and see how it makes so many situations simpler and how it gives you so much more insight into who you really are.
You can read more about this topic as well in the following 2 articles – SM Stress Reduction Program – Honesty and How to Live Life.
4. Be a Rebel:
You may wonder what being a rebel has to do with living a simple life? I say it is essential for doing so, as otherwise you will be caught in the rat race of society and will succumb to the burning ambition which is so much a part of the human consciousness you inherit. In order to reject the great momentum of materialism and demand for outward success, you will undoubtedly have to rebel.
Furthermore, you will have not just have to rebel once, but will have to be in rebellion to guard against getting swept up in the madness. As a rebel you will be able to think for yourself and forge a different path. If you have people around you wondering what the hell you are doing, that is a good sign, keep doing it :-).
5. Eat Simple Foods:
This is along the lines of balancing your stimulation and pursuit of pleasure, but as it is such an important area, it deserves it's own place on the list.
Eating simple, fresh, wholesome food is not just excellent for you health, but it also lends itself to creating an organism which is sensitive and refined. Furthermore, it helps you master your mind and senses, as you learn not to be a slave to your taste buds. Such discipline goes hand in hand with being able to live simply and with composure.
Simplifying your diet sends a message to all the sensory aspects of your life, that you are indeed not ! the slave! but the master.
The reason that simple living is so vital is that it helps you towards fulfilling the ultimate goal of human life, Self-Realization or Enlightenment. Enlightenment is the greatest challenge we face and we ought to do everything we can to help set the stage for it to occur, and simplification of your life and decluttering of your mind certainly help you to walk this difficult path.
Stay tuned for part 3 of this series as I am not done sharing life simplification tips with you just yet :-).
Related posts:
5 More Ways to Simplify Your Life
1. Be With Nature:You are an animal on this planet. Forgot? If you forget you will lose your connection with nature and not being able to connect with nature will make it very difficult to connect with other human animals. This wonderful world, with wide rivers, tall trees and starry skies is your world. When was the last time you looked up at the night sky and wondered about it all? When did you last sit in the shade of a tree and enjoyed the singing birds?
We get so entangled in our lives and are caught in so much ego aggrendization and self protection, that the simplicity and joy of just living has become a distant memory. So get it back by getting back to nature.
Spending time in nature will help you break the ever isolating activity of the ego mind. You will be able to step out of the clutches of society and your busy life for some time and just be aware of and connected to life. This will give you some much needed perspective of your life as you will be able to step b! ack and observe from afar. This is not just contributing to simplicity, but is also part of the process of meditation.
2. Be in the Moment:
One of the best ways to simplify your life and thinking is to learn to live in the moment. All the worrying about the future and all the rehashing of the past can be swept aside by adopting this all important approach.
Live moment to moment, day to day and see what happens. Don't be afraid. Having a plan about things is fine, but fretting and endlessly obsessing on what is going to happen is the surest way to miss living your life altogether. Books have been written on this topic and here is an article on the website which discusses more on how to live in the moment – Zen Mind – The Secret to Living in the Now.
3. Be Honest:
I should rephrase that to "Be Totally Honest". A lot of time and energy is wasted in planning what to say and in manipulating situations to gain desired results. If you decided to be completely honest instead, then you would not need to play all these games, waste all this precious time and complicate matters unnecessarily.
This may not be as easy to do as it seems, but it is eye opening if you try it. Be honest in word and action. So no deception of others and more importantly, no deception of yourself. Just resolve to be totally honest and see how it makes so many situations simpler and how it gives you so much more insight into who you really are.
You can read more about this topic as well in the following 2 articles – SM Stress Reduction Program – Honesty and How to Live Life.
4. Be a Rebel:
You may wonder what being a rebel has to do with living a simple life? I say it is essential for doing so, as otherwise you will be caught in the rat race of society and will succumb to the burning ambition which is so much a part of the human consciousness you inherit. In order to reject the great momentum of materialism and demand for outward success, you will undoubtedly have to rebel.
Furthermore, you will have not just have to rebel once, but will have to be in rebellion to guard against getting swept up in the madness. As a rebel you will be able to think for yourself and forge a different path. If you have people around you wondering what the hell you are doing, that is a good sign, keep doing it :-).
5. Eat Simple Foods:
This is along the lines of balancing your stimulation and pursuit of pleasure, but as it is such an important area, it deserves it's own place on the list.
Eating simple, fresh, wholesome food is not just excellent for you health, but it also lends itself to creating an organism which is sensitive and refined. Furthermore, it helps you master your mind and senses, as you learn not to be a slave to your taste buds. Such discipline goes hand in hand with being able to live simply and with composure.
Simplifying your diet sends a message to all the sensory aspects of your life, that you are indeed not ! the slave! but the master.
Summary of Ways to Simplify Your Life
From time to time all our lives get complicated, that is unavoidable, but there are certainly steps you can take which help to prevent such complications and at the very least by following these tips, you will not invite complications unnecessarily. Also these suggestions will help you untangle your life, if indeed it has become overly busy and complicated.The reason that simple living is so vital is that it helps you towards fulfilling the ultimate goal of human life, Self-Realization or Enlightenment. Enlightenment is the greatest challenge we face and we ought to do everything we can to help set the stage for it to occur, and simplification of your life and decluttering of your mind certainly help you to walk this difficult path.
Stay tuned for part 3 of this series as I am not done sharing life simplification tips with you just yet :-).
Related posts:
- 3 Ways to Simplify Your Life
- How to Simplify Your Life – Part 1
- 3 Beautiful Words that Can Change Your Life
- 10 Things You Should Do Everyday For a Happy, Meaningful & Good Life (Combined)
- 5 Unusual Ways to Get More Energy
Posted: 04 May 2013 12:01 PM PDT
Previously, guest author, Richard wrote popular articles about Om Mantra Chanting, The Awakening of Kundalini and Energy Centers, Yoga Pranayama for Beginners and So Hum Mantra Meditation. Today he teaches us 3 wonderful Buddhist Meditation Techniques. Each of these techniques is time tested and will suit different aspirants depending on their personality and preferences. Read on below and find one that is right for you.
Richard is a meditation teacher and author, and you will find more information on the courses he offers on his website How to Meditate n Heal.
 Discover how to meditate using the path that best suits your personality. You can successfully practice meditation many different ways. Choose the method below that best suits you, or combine the practices.
The method is very simple. There are only three basic components. The actual practice is very difficult.
Buddhists liken the untrained mind to a drunken monkey leaping about. There's absolutely no way to predict or control a drunken monkey's next wild antic. The same is true of your mind. Wild, crazy thoughts leap about in an ever shifting landscape of stories that continually stir up your emotions.
Many years of dedicated, daily Vipass! ana pract! ice can be necessary to tame your 'monkey mind'. But the wise understand that the path is the goal.
Mahayana Buddhism advocates actively practicing loving kindness to work first for your own liberation, then for the liberation of all beings. A popular mehtta (loving kindness) meditation is:
A strong personal connection between teacher and student is necessary to make this type of practice work best.
A good teacher can guide you through the process of discovering your inner luminescence in a few weeks or months. It's then up to you to continue your practice, going ever deeper into Divinity.
Please, choose your meditation technique and start meditating today. Liberation isn't far away!
Related posts:
Richard is a meditation teacher and author, and you will find more information on the courses he offers on his website How to Meditate n Heal.
How to Meditate — Three Different Buddhist Meditation Techniques
By Richard Crown
Buddhist Meditation Technique One: Empty Mind
Vipassana, or Anapanasati, is the classical Theraveda Buddhist meditation technique. Buddha reached Enlightenment under the Bodhi tree in North India using this empty mind meditation practice.The method is very simple. There are only three basic components. The actual practice is very difficult.
- Sit in a meditation posture. Full lotus is best if you can do it without discomfort. Other postures that work well are the half lotus and Burmese postures. If you're uncomfortable on the floor, sitting comfortably erect on a chair with both feet flat on the ground will work better for you.
- Use diaphragmatic (abdominal) breathing. Observe the feel of your breath coming in through your nose and going out through your mouth. Breathe deeply, gently and regularly. This will soon become an effortless habit.
- Observe your thoughts without following them. Simply watch each thought arise in your mind and then disappear.
Buddhists liken the untrained mind to a drunken monkey leaping about. There's absolutely no way to predict or control a drunken monkey's next wild antic. The same is true of your mind. Wild, crazy thoughts leap about in an ever shifting landscape of stories that continually stir up your emotions.
Many years of dedicated, daily Vipass! ana pract! ice can be necessary to tame your 'monkey mind'. But the wise understand that the path is the goal.
Buddhist Meditation Technique Two: Loving Kindness
Buddhist have developed other methods that are also used by Gurus and Yogis.Mahayana Buddhism advocates actively practicing loving kindness to work first for your own liberation, then for the liberation of all beings. A popular mehtta (loving kindness) meditation is:
- Visualize Buddha directly in front of you. At his sides and behind him are all the many other Buddhas, Bodhisatvas and Daikinis.
- See and feel their immense love pouring into your heart.
- Visualize the people you love most directly behind you, then your friends behind them and then the rest of humanity behind them.
- Send the love pouring into the front of your heart out of your back into all those behind you. This beautiful stream of love flowing through you cleanses and purifies you very quickly.
Buddhist Meditation Technique Three: Guru Puja
Vajrayana Buddhism, or the Diamond Path, is practiced by Tibetan Buddhists. Gurus and Yogis often use the same kinds of practices. These are very powerful methods. Sometimes realization occurs instantly if! the stud! ent is ready.- The teacher, or Guru, uses his psychic abilities to place his own ability to meditate in deep states into his student's minds. Students instantly become able to meditate in very profound states.
- The student then diligently does the practice the Guru prescribes to anchor the state in himself.
A strong personal connection between teacher and student is necessary to make this type of practice work best.
- Meditate on your Guru, the Guru's picture or an object that your Guru has impregnated with energy.
- See/feel the Guru's Divine essence entering your heart and mind. Expand the Divine luminescence out through your entire being until you become Divine, just like your teacher.
A good teacher can guide you through the process of discovering your inner luminescence in a few weeks or months. It's then up to you to continue your practice, going ever deeper into Divinity.
Please, choose your meditation technique and start meditating today. Liberation isn't far away!
About Richard
You can find helpful meditation resources on Richard Crown's site How to Meditate n Heal where he teaches all of the techniques above and more via Skype and Teleconference. Books, videos and the blog are all free for you. Meditation webinars, forum and personal courses are also available. Have a look now!
Connect w/ Anmol


Related posts:
- Buddhist Meditation Video
- Zen Buddhist Meditation Technique Wins Survey
- Free Online Guided Meditation Techniques E-Book
- Pranayama for Beginners | The Basics of Yoga Breathing Techniques
- Meditation Techniques, Types and Practice – A Comprehensive Guide
Posted: 04 May 2013 12:00 PM PDT
Yoga to Lose Fat
There are countless weight loss success stories from those who have taken up a consistent and serious yoga practice. So there is little doubt that yoga is an effective weight loss solution and that yoga helps burn calories and reduce fat. The reason though that yoga is so good for helping you lose weight and keep it off, is not simply because of the physical workout that a yoga practice obviously provides. It is also due to the many other benefits and powers of yoga, such as helping you find positivity, joy, confidence, self-love, peace and emotional balance, while also helping you detox, heal and move towards a more wholesome and healthier way of life. All this combined really helps with the problem of excess weight and obesity.These emotional, spiritual and mental benefits though do not mean that yoga cannot give you one mean workout. Ask anyone who has taken a class with my teacher, Ravi Singh, and you will know how rigorous a yoga class can be :-).
There are many excellent yoga routines and targeted exercises which are geared towards helping you burn calories and lose weight. I have provided many such sets on the website and below you will find a list of them. Today though I want to detail another such calorie burning yoga exercise for you.
This exercise, called Yoga March, along with being a calorie burner, is also an excellent exercise for starting your yoga practice and getting warmed up. Often one thinks that stretching is the best way to warm-up, but one should keep in mind that stretching cold muscles and tendons often puts one at risk for strains and tears. So, although light stretching is ok to do as a start-up! , it is better still to warm-up the entire body with some light aerobic exercise before doing vigorous stretching. Yoga March fits this bill perfectly.
Yoga March will not only get your blood pumping, it will also get your entire system ready for more vigorous yoga, while at the same time getting you started on your calorie burning routine right away. Below you will find details of how to practice Yoga March along with illustrations, variations, step-by-step instructions, benefits and practice tips.
More Calorie Burning Yoga Sets and Poses:
As mentioned above here are links to other excellent yoga workouts and exercises for burning calories and losing weight. In addition, you will find links to the Free Online Hatha Yoga Galleries here and the Kundalini Yoga Exercises collection here. Both these resources have many more yoga poses and exercises which you will find useful in developing your personal yoga practice.
Online Yoga Exercises for Healthy Weight Loss
Best Yoga for Weight Loss
Post Natal Yoga Exercise to Lose Weight
For Yoga and Yoga Certification Course Students:
For students enrolled in the Yoga Teacher's Training and Yoga Certification Program, I suggest to mix this exercise into your classes as a warm-up from time to time. There are of course many excellent yoga sets for warming up, but this exercise is as good as any of them. If you are teaching a targeted weight loss or calorie burning class, then certainly do include this exercise into the routine. It is an exercise which almost everyone can do and which can be modified according to each student's fitness level and proficiency.For those interested in finding out more about these online certification programs you will find information on the Yoga Teacher's Training Program here and the Yoga Certification Course here.
Yoga March Illustrations

Yoga March Right Leg – Illustration #1

Yoga March Left Leg – Illustration #2
A. How to do Yoga March:
- Stand nice and tall, then bring your arms behind your lower back and interlace your fingers. Palms are facing each other.
- Next pull your hands away from your lower back to create stretch in your arms and shoulders as shown in illustration #1 above.
- Now begin Breath of Fire Breathing Exercise and being to march in place. Your head should be straight looking forward and try to bring your knees up high as your march in place.
- The higher and faster you march the more calories you will expend and the more difficult the exercise will be. Also doing Breath of Fire in conjunction with the marching will increase the intensity of this exercise.
- There are many ways to modify this exercise to suit your level. You can switch to Long Deep Breathing if Breath of Fire is too much. You can also release your arms and have them move as if you were walking or jogging. You can also simply walk in place if you get winded and then begin marching once you recover.
B. Duration:
- S! tart with! 1 Minute and build up from there to 5 minutes or more.
C. Yoga March Benefits:
- Helps to strengthen your hearth and cardiovascular system.
- Helps your respiratory and circulatory systems.
- Helps to burn calories and promotes weight loss.
- Good exercise for warming up prior to deep stretching or vigorous yoga.
- Helps to strengthen your calves and legs.
- Helps to stretch and open up your shoulders, arms and chest.
D. Practice Tips for Yoga March:
- Do interval training in order to develop your fitness and stamina. This means that you can do 1 minute vigorous marching, followed by 30 seconds walking and then 1 minute high intensity again. This kind of training is very good for developing your fitness rapidly.
- Keep in mind that in addition to yoga exercises, yogic breathing is also a proven method for weight loss. 2 good pranayama techniques for weight loss are Kapalbhati and Bhastrika.
- If you are looking for a combined approach for burning calories, reducing fat and losing weight, you will want to explore the Free Online Weight Loss Program here.
- Teachers if you are requesting the students do this exercise with their eyes closed, be aware they will end up all over the place, so ensure there are no unwanted collisions :-).
Connect w/ Anmol
